Sunday 25 February 2018

Scrappy Socks

The yarn needed to knit a pair of socks is a little bit less than 100g, and since most balls are either 100g or 50g, it does beg the question of what to do with the leftovers, so I decided that seeing as I have small-ish feet, I was going to make one small sock out of the left over yarn from each pair of socks!

The sock pattern I've used is the same one that I used to make my original pair of socks, as well as the ones for Mr M, the link to it can be found on those blog posts. I modified the pattern so that it was an ankle sock, just by taking out the rows in stocking stitch before the heel flap is knitted. This means that you will knit an inch of double rib for the sock cuff and then go straight into knitting the heel flap.

The one thing that I did do differently with this sock is to knit with only 60 stitches in the round, instead of 64. I found my last pair of socks, ever so slightly to baggy, but these fit like, well, a sock! I also swapped down to a 2mm circular needle, instead of 2.5mm double pointed needles, and the only problem I encountered was that I forgot that, smaller needles meant smaller work, and that included the length of the sock... My measuring I think was also out, but luckily I tried the sock on before I grafted the toe together! Oops!

I intend to make a few more little scrappy socks, the next one will be the leftover yarn from Mr M's Christmas socks! Admittedly this sock still left a fair bit of left over yarn. I think I will make a proper scrappy pair of socks with all the smaller leftovers from various socks. But first I'll learn how to knit two socks at once on the same needle... That will be fun!


Sunday 18 February 2018

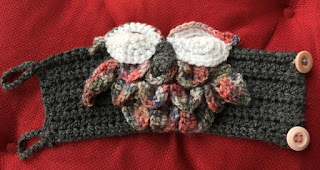
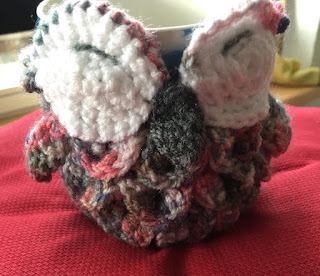
Owl Mug Cozy

This was another Christmas present make, this time for my sister in law, who really likes owls. I found this pattern for a mug cozy on ravelry, and it is available as a free download here.

The pattern itself does not use up a large amount of yarn, so it really can be a little stash buster, especially if you use different colours for different parts, which is recommended as it allows the little details to stand out.

This is a crochet make, and being primarily a knitter I did struggle a little bit. I know my basic crochet stitches, and the main part of the cozy I got done no problem. The only difficult part was the feathers on the belly of the owl. The stitch used is known as crocodile stitch, and fortunately there is a link to another website, on how to do it, in the pdf pattern, which is hyperlinked, and if you have the pattern open in a web browser, clicking on it will take you to it. The guide is good, and has clear pictures to help you along.

Admittedly the crocodile stitch is very very daunting for someone new or not experienced in crochet, and you really do have to just take it one step at a time to get through it. The stitch does use something called a Back-Post Double Crochet, which you might as well be speaking russian to me, I had no idea what it was... There is a link in the website tutorial for crocodile stitch for back-post double crochets, but I did find a "For Dummies" website which I found easier to understand here.

The owl itself is mostly modular, so you crochet all of the parts and then sew them together. What you will need, apart from a hook and some yarn, is two buttons, try and get ones that compliment the yarn that you have used. It might even be worth crocheting the whole thing and then finding buttons that fit, and go with it, or else finding some buttons before you start, and then crocheting the loops on the back to fit the buttons. But that is up to you.


Monday 12 February 2018

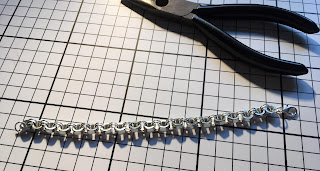
Nut Bracelet

This make has been an idea for a long time, but now it is finally a reality. I got the idea from a picture I saw on Pinterest, but unfortunately I never actually saved the photo... So I freestyled my own.

To make the bracelet I used M4 nuts (from a local hardware shop), 7mm jump rings and a clasp, (mine were from Hobbycraft).

The nuts, and the jump rings both came in a pack of 100, so I had a fair amount to play with, and I do have small wrists. I worked out that the circumference of my wrist is about 170mm. I had tried to work out how many nuts I would need, but it was difficult to take into account the jump rings, and the clasp. So I just started making a chain of nuts and jump rings and trying it on for size. I found out I needed 19 nuts.

The nuts are connected to the nut next to them using two jump rings, so on the main bracelet I had 19 nuts, held together with 36 jump rings, in pairs. The clasp I had can only take one jump ring at the bottom where it needs to be attached. So in one of the end nuts there is one jump ring attaching the clasp.

I did try out of curiosity, if the clasp would close over one of the nuts, but the clasp I got is too small, the nut will fit in, but the clasp will not close, so I added another jump ring to the other side. So in total there are 38 jump rings on the bracelet.

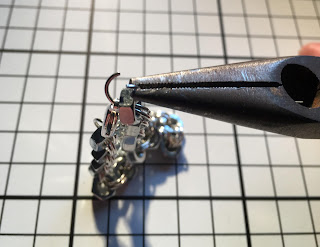
Jump rings themselves are really easy to use, especially if you have a pair of thin nose pliers, some people recommend pliers with round noses, but anything that can help you grip the jump ring will be fine. Grip the jump ring with the pliers, and either using your hand or another set of pliers, twist the ring so that the two ends have seperated. This will allow you to thread things onto the ring, before twisting it back the other way to shut it. Occasionally you will find that there is a small gap between the two ends of the ring once it is closed. To avoid this when I'm twisting the ring back, I apply a force inwards as well, this tends to push the two ends closer together, and does get rid of the gap.

The bracelet is very easy to make, and is pretty much just threading nuts onto jump rings. The bracelet can very easily be made to a size that fits any wrist, or ankle, just by adding and taking away nuts.


Monday 5 February 2018

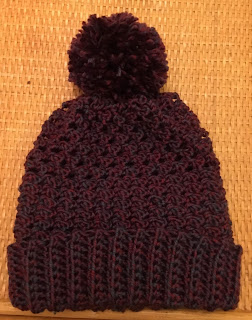
Snowball Beanie


The other day I came across a lovely looking hat on pinterest, and as the stash was becoming slightly out of control I thought I would try it! The pattern was a free pattern on Left In Knots, and is also available to buy on Ravelry.


I managed to make the hat with two 50g balls of what I think was double knit! And the adult size hat looks like a small size, but does stretch out nicely.

It's made by crocheting the band of the hat in rows, before working the top in the round, which grafts onto the band.

The hat took me a couple of days to make and did grow very quickly. The pattern online gives the instructions on how to make the hat and does give a few ideas for the bobble on the top.

For my bobble, I made a pompom, as in the photos on the pattern, but the pattern doesn't give instructions for how to make one, but it was something I have done before.

To make pompoms you need two rings, you can buy pompom makers, which come in four parts and are very easy and quick to use, but I mocked myself up a pompom maker from on old cardboard box, that I think once held hammers.

The size of the rings made, will give you the size of the pompom, the bigger the rings, the bigger the pompom. The wool is wrapped around the two rings, keep on winding the wool around so there is a good thick layer.

Then cut the wool around the edge of the cardboard rings. This will allow you to wind a bit of wool between the two cardboard rings, tie it in a tight knot, and you should have what looks like a pompom, with two cardboard rings around the midde!

The pompom can be trimmed into shape (whatever shape you fancy, I went traditional sphere!), and then it is ready to attach to the hat. There isn't really a special way to attach the pompom, if you leave a long enough tail from tying the pompom it can be used to sew it onto the top of the hat.

The hat made a happy home with Mam, she loves purple, and she is always happy to have things made for her!