Sunday 25 March 2018

Embroidery Cat

I have never done a proper embroidery project before, I have done a few small cross stitches, but from following an embroidery page on instagram (@hopebroidery) I have become more and more interested and decided I would try and give it a go.

For starting new things I find the kits in Hobbycraft do give you a good start. They give you all you need and some instructions. So that is where this Embroidery Cat Kit came from.

Snapped.
The stitch used is called the Surface Satin Stitch, it differs from the normal, Satin Stitch, as the thread mostly stays on the top surface of the piece. I did really enjoy making embroidery cat, and I think I'm going to try some new things in the future, maybe do a little freestyle kit-less embroidery!

I did have slight trouble when making embroidery cat, I went to Manchester and decided to take embroidery cat as a traveling project. Those of you who read about the slouch hat I made when I went to Germany, will know that on the plane, my knitting needles (both of them) snapped... Well, it turns out I don't have much luck with travelling makes, as I managed to snap the eye on the needle for the embroidery. This was the needle that the kit came with, and to be honest I do think that it might have been ever so slightly too small, as I was struggling to pull it through the fabric at points.

Anyway, thanks to Amazon Prime, I was back with a needle in a couple of days, and back to finishing the cat.

Embroidery Cat was finished back home. We had a LOT of snow when the first "Beast Of The East" came to visit, and I was snowed in the village for three days, but it gave me time to do a few nice projects, and I got embroidery cat finished!

On a background of snow.

Monday 19 March 2018

Warm and Cozy

During the recent heavy snow in my part of England, I thought there was no better time to make a hat. This is a hat that I have been planning to make for a LONG time, and I have finally got around to it.

Years ago I got given a book of patterns for animal hats, (at the time I was always was wearing woolly animal hats, the monkey was my favourite!), unfortunately I never got around to making a hat from it. Now I wanted to make a walrus, and there wasn't actually a pattern for a walrus in the book, so I've had to make my own.

From the book I used the adult size pattern to make the basic hat, (it was a pattern for a chicken hat, but I left off the beak and comb), the rest of the hat I made up as I went along.

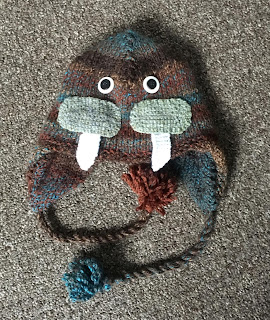
The hat is a basic woolly hat shape, has two tassels, which on the end of which are pom poms. I used a variegated chunky yarn for the main hat, that was a basic brown shade, but was a little more jazzy.

The cheeks, and tusks are made separately and sewn onto the hat, as are the eyes. The eyes are one white button and one black button each, sewn on in place with some black thread.

The tusks I knitted with an odment of white DK yarn from the stash, and the cheeks are crocheted, with a lighter colour variegated DK yarn. I made up the pattern for these two pieces and have included it below, for anyone who wants to have a go.

The hat, has a knitted lining in the ear flaps, and a fleece lining for the main hat. The book has the patterns for the lining and the instructions on how to do it. There was an option for a knitted lining to the hat, but I felt a fleece lining would be a little nicer. I might try a knitted lining next time.

Tusks Pattern (Make two):
On UK size 9 needles, cast on 2.
Row 1: Knit (and all odd rows)
Row 2; Kfb, K1
Row 4: K2, Kfb
Row 6: Kfb, K3
Row 8: K4, Kfb
Knit another 20 rows in garter stitch,
Cast off.

Cheeks Pattern (Make two): (all stitches are UK stitches)
With a 4mm crochet hook, chain 11.
dc in stitch 1 from hook,
dc in the next 8 chains,
3dc in last chain,
dc in the bottom of the 9 chains and slip stitch into first chain to create a round.

Chain 1, 2dc in 1st dc, dc in next 8 dc, 2dc in next dc, 3dc in next dc, 2dc in next dc, dc in next 9 dc.
2dc in next 4 dc, dc in next 9 dc, 2dc in next 6dc, dc in next 10 dc, 2dc in next 6 dc, dc in next 11 dc, 2dc in next 3 dc, dc in next 3 dc, 2dc in next 3 dc, dc in next 12 dc, slip stitch, cut and fasten off.

I appologise if this crochet pattern doesn't make much sense, I am a knitter really, and I struggled to write down exactly what I did. The outcome you are looking for is a long oval shape, it doesn't really matter how you get there.

Sunday 11 March 2018

The Lanthanides

Slow but kind of steady progress is being made on the periodic table blanket. It has been a on going project for a little while now, the first post about it here, was from the 3rd of February last year... Oops!

Anyway I have now managed to complete the Lanthanides. Once I've sewn the blanket together I'm going to think about putting the chemical symbols on it.

The lanthanides occupy one of the very bottom lines of the periodic table, and are the rare earth elements. Technically they sit inside the periodic table, between barium and hafnium, but they would look a bit silly there, so they sit along the bottom.

At the moment I'm working through getting some of the squares around the table itself to make it a more rectangular blanket shape. Although the next load of squares to go will be groups 3 to 12, which are mostly metals.

Sunday 4 March 2018

Mam's Birthday Present

It was my Mams birthday recently, and I have to admit I was not very prepared at all... Bad daughter and all... I was trying to make her a card for her birthday, but it all went a little bit wrong, and she only got a bunch of flowers on the actual day.

The card I was trying to make, was going to be a small cross stitch inside the card. The cross stitch was actually finished the day after her birthday, and instead of putting it into a card I asked her if she would like it in a frame, she said yes. This is the result.

The cross stitch itself was a little kit from Hobbycraft, and I believe it was actually on of their Easter special kits, but why it was around in January boggles the mind! The frame itself was one from a local shop, and I decided that I would jazz it up to make it that little more special. I found two heart buttons, and some wooden letter beads, which I simply glued on with a bit of PVA. I did also have to create the card surround for the cross stitch, I cut a 6x4 piece of purple card (mam's favourite colour) to fit the frame and a 3x3 inch square in the middle. I probably should have used a ruler when cutting though, as it is ever so slightly wonky. But she loves it, and the daughter points are made up!