Showing posts with label Yarn. Show all posts

Sunday, 10 May 2020

WIP Sunday (?) - Helios Wing Shawl

It has been a busy week at work and there hasn't been much in the way of finished objects, so I thought I would share a new project with you all that has my brain working hard to keep up. A little while ago I won a wonderful pattern called the Helios Wing shawl by Beardychiel Designs. It is a lovely shaped shawl with a mixture of lace panels and plain stocking stitch panels. 


The going is pretty simple and the pattern well written, but the lace sections really do give me something to think about and are perfect for these times of social distancing and allow me to get lost and not pay the world around me much attention. I turned to this pattern, mainly because I was a little bored of what I already had on the needles and needed something new to perk my interest and get involved with. It did just the trick. 

I haven't got too far along with the shawl, as it does require my full attention, but I am about 100 rows in and loving how it is coming out so far. 

I am using the recommended needle size, but the yarn is John Arbon, Devonia DK in the Pollen Gold colourway. The pattern calls for a 4-ply weight yarn, but this DK is so light that the drape of the fabric is lovely anyway. My gauge is also a little on the loose side as well so the two have played into each other and I was able to cast this on using something from stash. 

So the shawl is coming along nicely, and providing a welcome distraction. So hopefully it won't be too long until it's finished! 


Tuesday, 14 May 2019

Me-Made-May 2019 - Winging It Jumper

Day 9 for Me-Made-May is a cozy, stay at home jumper. This is the first adult sized garment I had ever knit. It started from when I had just finished a baby jumper and I thought "How hard can it be to make one adult sized". It turns out, pretty hard. I managed it, and it was the plainest and squarest jumper there ever was.

The jumper is made out of super chunky, acrylic yarn. I had one huge ball that my friend gave me, but she had got it from Aldi, and I couldn't find any more when I realised I wouldn't have enough for the whole jumper so had to find something else that would do.

I started off swatching to find the right needle size for the type of fabric that I wanted. I'm not a very good swatch maker, I just don't really know how to do them properly, and I always feel like I'm using up yarn that could be useful somewhere else. Which is probably why I have never cast off a swatch. Which may have been my downfall.

I cast on in the end, writing down everything as I went, although I am still yet to actually write up what I did! I went for a top down jumper in the round. Which is how the baby jumper was constructed, and the only way I knew how. Needless to say it has quite a wide neckline, I'm not sure how I feel about it, but it is what it is.

I knit down the plain body, I added one little stripe before I switched to the other colour in a hopeless attempt to make it look like the colour change was intended. I finished off the body with a rib. I then started on the sleeves, these I was quite pleased with in terms of matching the body of the jumper. I wasn't so pleased with the cuffs though.

I had made the sleeves longer then the body, but probably not long enough, sadly only something I realised much much later. One of the things I was proud of when knitting my sleeves was picking up stitches in the armpit before knitting the rest of the sleeve and avoiding holes.

The jumper sadly just got worn for the finished object photos and never again. For part of Me-Made-May I am trying to finish off or fix garments I have but I don't seem to wear. This was one of them. I decided that one of the reasons I don't wear the jumper is because of the cuffs.

I had no experience of jumpers, and I didn't even know that sleeves had shaping in them - such a rookie. The cuffs were the same size as the rest of the sleeves and just kind of flopped around my wrists, I didn't like. So I ripped the sleeve ribbing out. I knit 2 together for every knit stitch in the first row of ribbing and then I knit the same amount of ribbing as I had done originally. This made it so much better. I felt that I was able to wear it around the house then.

Only after wearing it for Me-Made-May, I then found out the things I don't love about it. But they are livable with. I'll be wearing it again sometime, and maybe thinking of how I can improve it. I will now leave you with the instagram story, hopefully this jumper will get more wear in time. Perhaps I will grow to love it - Happy making!


Sunday, 8 July 2018

Don't let the bed bugs bite!

This was a cute little pattern shown to me by my friend Shanni, from a book called Knitting Mochimochi, and it was such a cute pattern I had to have a go! Its called the Bite-Free Bedbug. And it is a little six legged bug, who is very ready to get some kip.

The first one I knitted was this little light aqua coloured one. The yarn I was using was leftover yarn from my Two-Tone Scarf, and his little hat, some leftovers from the Legwarmers I made quite a while ago too. So the bug itself doesn't use much yarn at all.

The Bug is knit entirely in the round, and the suggested needles are four, 4mm DPNs. You knit the main body first and before you finish, you stuff him, before continuing to the end, adding a little more stuffing and then cast off.

I found him really quite simple to knit, and the book itself explained everything, and was well written. The hat was also knit in the round, and added on afterwards, which I thought was a lovely addition. The eyes are sewn on using a contrasting colour at the end as well, just to give it that little sleepy look too.

Whilst the pattern was easy, it was rather fiddly. Especially when it came to the legs and ears, as they were knit separately, then sewn on, but having something to rest it on helped.

But I enjoyed knitting the first one so much, and still had a lot of leftover yarn I decided to make another in opposite colours. Now interestingly, the second one was ever so slightly smaller than the first one. Now I don't know if that is down to tension, or the differences from when I stuffed them? I'm really not sure, but they do look ever so cute together.

On a slightly soppy note, I did give one of them to Mr M and kept the other for myself. He really liked his, I let him choose which one he wanted, and he kept the lighter colour one.


Sunday, 17 June 2018

Emma's Socks

My good friend Emma asked me if I could make her a pair of socks, in the wake of me making a pair for Mr M and for Mam. Of course I said yes, and she was lovely enough to buy the yarn for me.

I wanted to try a sock in a different way to the normal, cuff down with a heel flap and gusset, that I have been making up until now. So I googled how to knit a sock toe up, because why not give it a go! In all my googling and reading I came across a website called The Spruce Crafts. It gave some general instructions on how to knit a sock toe up, including links as to how to do a turkish cast on, and a short row heel.

I did a little research into how to do turkish cast on's, as at the time I was away on holiday, sat in bed in the evening, with one set of DPNs and my yarn. Mr M got slightly irritated with the complaining of how exactly I was going to cast on, but I worked out a way! (and a video to come hopefully so - watch this space!)

Anyway the first Cast-On-Hurdle was overcome and I was back to knitting! I cast on 64 stitches for this sock, as I had made socks with that many stitches before, and they were slightly large on my feet, but Emma's feet are wider, so it was a safe bet. With these socks I mainly referred to the website for the casting on and for the heel. The rest I was fairly confident that I could work out myself. :)

Increasing for the toe was mostly the opposite of decreasing for the toe, and was fairly easy, and knitting the length of the foot was a doddle. One thing I did have to look up was how much room to leave for knitting the heel. I had measured Emma's foot before making her socks, and had an overall length I wanted them to be, but I found out when to stop on the Spruce Crafts website.

I did get rather confused knitting the heel, but following the links to a more in-depth page on the Spruce Crafts website got me through it, and there are only a few holes...

I'm really not sure why there were holes in my heel, but I think with a little more practice I can get them less saint like! (any suggestions or tips on short row heels would be greatly appreciated!)

Carrying on up the top part of the sock and to the cuff was easy too. I did the top of the sock at 13 cm long like most of my other socks, followed by a single rib cuff an inch tall.

Casting off was interesting. It was only until I came to casting off did I realise that the socks would need a stretchy cast off to be able to go around the foot when putting them on. People do tend to take socks on and off... I followed the instructions for the cast off on the Spruce Crafts website, but I didn't like the look of it, to I took it out and went on the search for another cast off that I liked better. In the end I found Jeny's Surprisingly Stretchy Bind Off on Knitty.com. In my opinion it looked so much better, and the step by step pictures really helped get my head around what I was meant to be doing.

The yarn used on the socks was a Regia yarn, from the Arne and Carlos Design Line in the Bramble colourway. The way it patterns really pleases me and I love them. I really do need to try their Pairfect yarn at some point though!

The socks did turn out well and they were loved from the minute Emma put them on her feet for a photo. Luckily they did fit too! I have to admit I did have a little bit of Second Sock Syndrome when making them, and the second one did not get cast on for a little while. But they got finished in the end and all was well.

Thursday, 19 April 2018

Mam's Socks

In the wake of all the new sock making, my Mam asked if she could have a pair of socks made. (It was more a "you haven't made me anything in aggeeessssss" kind of remark.) But I really enjoy knitting socks, so I was very happy oblige.

These socks were the second ever that I had made on a circular needle, using the magic loop method. The first sock I made on a circular needle was my scrappy sock, I made it mostly to see how a 60 stitch sock would look and feel like on a 2.5 mm circular needle. The scrappy sock was only an ankle sock, but it fitted well, and seeing as Mam has the same size feet as me I thought it would be fine.

I used my trusty sock pattern I found on love knitting, which I wrote about here. I have to admit the pattern isn't great for knitting on a circular needle, it gets a little tight but it is doable. I am going to look at doing heels differently, because there are many different ways of making heels, and I have an urge to try and learn every one! Maybe just make every one once...

The socks did take me a little while, they had been on my needles for ages and I made quite a few other things before they were done. The top part of the sock I made 12 cm long, which is a little bit shorter than my other socks, but Mam is a little bit shorter, so her socks were too.

The socks were finally finished in Tywyn. The toes were kitchener stitched up whilst watching the 11:40 departure from Wharf Station on the Talyllyn Railway. Mam at the time was volunteering in the booking office, so they were made and delivered to her through the booking office window!

I did make the socks one at a time, which meant there was a small amount of second sock syndrome. One of the reasons for learning the magic loop method of making socks, is to learn how to make socks two at a time, but that might be for next time.

Mam was very very happy to get her socks, she'd been waiting a little while... oops... but she was happy, and I hope they fit her well. I did try them on, and the cuff was a little tight. So I'm going to try knitting with 64 stitches for me next time.

Sunday, 15 April 2018

Cabled Mitts

I was looking for a challenge recently, 
and I decided that I wanted to try something new. I came across this lovely cabled mitten pattern on Love Knitting called Nalu Mitts by Leila Raabe. 

They are a simple pattern for fingerless mittens, with a nice cabled section along the back of the hand. 

I decided to use some yarn out of my stash. It was a blue-y variegated yarn, of a DK weight. DK is the yarn weight that is used in the pattern, although it uses a lovely pale grey colour which really suits it, as well as a set of 3.25mm double pointed needles.

Doing the cable along the back of the mitten was easier then I thought it would be. I am hoping that with a little more practice doing cables I'll begin to understand how they work and be able to use them in my own knitting.

The mittens knitted up really quickly, and despite all the mistakes, including knitting the wrong size thumb (oops!) they are pretty snug, and they look fine. 

Once I had blocked my mittens they then went as a present to my friend Emma, who was admiring them when I was knitting them. They knitted up quite quickly, and were fun to knit too. 

So they were a joy to knit, and seem to also be enjoyed by their new owner. 

Monday, 19 March 2018

Warm and Cozy

During the recent heavy snow in my part of England, I thought there was no better time to make a hat. This is a hat that I have been planning to make for a LONG time, and I have finally got around to it.

Years ago I got given a book of patterns for animal hats, (at the time I was always was wearing woolly animal hats, the monkey was my favourite!), unfortunately I never got around to making a hat from it. Now I wanted to make a walrus, and there wasn't actually a pattern for a walrus in the book, so I've had to make my own.

From the book I used the adult size pattern to make the basic hat, (it was a pattern for a chicken hat, but I left off the beak and comb), the rest of the hat I made up as I went along.
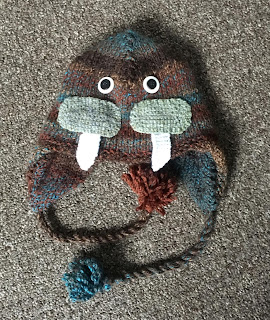
The hat is a basic woolly hat shape, has two tassels, which on the end of which are pom poms. I used a variegated chunky yarn for the main hat, that was a basic brown shade, but was a little more jazzy.

The cheeks, and tusks are made separately and sewn onto the hat, as are the eyes. The eyes are one white button and one black button each, sewn on in place with some black thread.

The tusks I knitted with an odment of white DK yarn from the stash, and the cheeks are crocheted, with a lighter colour variegated DK yarn. I made up the pattern for these two pieces and have included it below, for anyone who wants to have a go.

The hat, has a knitted lining in the ear flaps, and a fleece lining for the main hat. The book has the patterns for the lining and the instructions on how to do it. There was an option for a knitted lining to the hat, but I felt a fleece lining would be a little nicer. I might try a knitted lining next time.

Tusks Pattern (Make two):
On UK size 9 needles, cast on 2.
Row 1: Knit (and all odd rows)
Row 2; Kfb, K1
Row 4: K2, Kfb
Row 6: Kfb, K3
Row 8: K4, Kfb
Knit another 20 rows in garter stitch,
Cast off.

Cheeks Pattern (Make two): (all stitches are UK stitches)
With a 4mm crochet hook, chain 11.
dc in stitch 1 from hook,
dc in the next 8 chains,
3dc in last chain,
dc in the bottom of the 9 chains and slip stitch into first chain to create a round.

Chain 1, 2dc in 1st dc, dc in next 8 dc, 2dc in next dc, 3dc in next dc, 2dc in next dc, dc in next 9 dc.
2dc in next 4 dc, dc in next 9 dc, 2dc in next 6dc, dc in next 10 dc, 2dc in next 6 dc, dc in next 11 dc, 2dc in next 3 dc, dc in next 3 dc, 2dc in next 3 dc, dc in next 12 dc, slip stitch, cut and fasten off.

I appologise if this crochet pattern doesn't make much sense, I am a knitter really, and I struggled to write down exactly what I did. The outcome you are looking for is a long oval shape, it doesn't really matter how you get there.

Sunday, 11 March 2018

The Lanthanides

Slow but kind of steady progress is being made on the periodic table blanket. It has been a on going project for a little while now, the first post about it here, was from the 3rd of February last year... Oops!

Anyway I have now managed to complete the Lanthanides. Once I've sewn the blanket together I'm going to think about putting the chemical symbols on it.

The lanthanides occupy one of the very bottom lines of the periodic table, and are the rare earth elements. Technically they sit inside the periodic table, between barium and hafnium, but they would look a bit silly there, so they sit along the bottom.

At the moment I'm working through getting some of the squares around the table itself to make it a more rectangular blanket shape. Although the next load of squares to go will be groups 3 to 12, which are mostly metals.

Sunday, 25 February 2018

Scrappy Socks

The yarn needed to knit a pair of socks is a little bit less than 100g, and since most balls are either 100g or 50g, it does beg the question of what to do with the leftovers, so I decided that seeing as I have small-ish feet, I was going to make one small sock out of the left over yarn from each pair of socks!

The sock pattern I've used is the same one that I used to make my original pair of socks, as well as the ones for Mr M, the link to it can be found on those blog posts. I modified the pattern so that it was an ankle sock, just by taking out the rows in stocking stitch before the heel flap is knitted. This means that you will knit an inch of double rib for the sock cuff and then go straight into knitting the heel flap.

The one thing that I did do differently with this sock is to knit with only 60 stitches in the round, instead of 64. I found my last pair of socks, ever so slightly to baggy, but these fit like, well, a sock! I also swapped down to a 2mm circular needle, instead of 2.5mm double pointed needles, and the only problem I encountered was that I forgot that, smaller needles meant smaller work, and that included the length of the sock... My measuring I think was also out, but luckily I tried the sock on before I grafted the toe together! Oops!

I intend to make a few more little scrappy socks, the next one will be the leftover yarn from Mr M's Christmas socks! Admittedly this sock still left a fair bit of left over yarn. I think I will make a proper scrappy pair of socks with all the smaller leftovers from various socks. But first I'll learn how to knit two socks at once on the same needle... That will be fun!


Sunday, 18 February 2018

Owl Mug Cozy

This was another Christmas present make, this time for my sister in law, who really likes owls. I found this pattern for a mug cozy on ravelry, and it is available as a free download here.

The pattern itself does not use up a large amount of yarn, so it really can be a little stash buster, especially if you use different colours for different parts, which is recommended as it allows the little details to stand out.

This is a crochet make, and being primarily a knitter I did struggle a little bit. I know my basic crochet stitches, and the main part of the cozy I got done no problem. The only difficult part was the feathers on the belly of the owl. The stitch used is known as crocodile stitch, and fortunately there is a link to another website, on how to do it, in the pdf pattern, which is hyperlinked, and if you have the pattern open in a web browser, clicking on it will take you to it. The guide is good, and has clear pictures to help you along.

Admittedly the crocodile stitch is very very daunting for someone new or not experienced in crochet, and you really do have to just take it one step at a time to get through it. The stitch does use something called a Back-Post Double Crochet, which you might as well be speaking russian to me, I had no idea what it was... There is a link in the website tutorial for crocodile stitch for back-post double crochets, but I did find a "For Dummies" website which I found easier to understand here.

The owl itself is mostly modular, so you crochet all of the parts and then sew them together. What you will need, apart from a hook and some yarn, is two buttons, try and get ones that compliment the yarn that you have used. It might even be worth crocheting the whole thing and then finding buttons that fit, and go with it, or else finding some buttons before you start, and then crocheting the loops on the back to fit the buttons. But that is up to you.


Monday, 5 February 2018

Snowball Beanie


The other day I came across a lovely looking hat on pinterest, and as the stash was becoming slightly out of control I thought I would try it! The pattern was a free pattern on Left In Knots, and is also available to buy on Ravelry.


I managed to make the hat with two 50g balls of what I think was double knit! And the adult size hat looks like a small size, but does stretch out nicely.

It's made by crocheting the band of the hat in rows, before working the top in the round, which grafts onto the band.

The hat took me a couple of days to make and did grow very quickly. The pattern online gives the instructions on how to make the hat and does give a few ideas for the bobble on the top.

For my bobble, I made a pompom, as in the photos on the pattern, but the pattern doesn't give instructions for how to make one, but it was something I have done before.

To make pompoms you need two rings, you can buy pompom makers, which come in four parts and are very easy and quick to use, but I mocked myself up a pompom maker from on old cardboard box, that I think once held hammers.

The size of the rings made, will give you the size of the pompom, the bigger the rings, the bigger the pompom. The wool is wrapped around the two rings, keep on winding the wool around so there is a good thick layer.

Then cut the wool around the edge of the cardboard rings. This will allow you to wind a bit of wool between the two cardboard rings, tie it in a tight knot, and you should have what looks like a pompom, with two cardboard rings around the midde!

The pompom can be trimmed into shape (whatever shape you fancy, I went traditional sphere!), and then it is ready to attach to the hat. There isn't really a special way to attach the pompom, if you leave a long enough tail from tying the pompom it can be used to sew it onto the top of the hat.

The hat made a happy home with Mam, she loves purple, and she is always happy to have things made for her!

Sunday, 21 January 2018

Get Ahead, Get a Hat

This is the first of a couple of hats that I made over the Christmas break. I was given a kit for a hat and arm warmers quite a while ago by my friend Nicky (who I made a blanket for which you can see here) and I finally got around to making them.

The kit came with its own pattern, and both parts are knitted flat then seamed together, and I started the hat as a travelling project to take out to Germany. The journey started fine, but by the time I had made it out the airport in Germany, I had snapped both of the old (and brittle) needles that I had, and one was in three pieces... It was a small disaster, but I soon found out that German supermarkets sell knitting needles (hurray!) and the disaster was a very short lived one and I got back to keeping my hands happy.

By the time we made it back to England the hat was done and I had finished the first arm warmer on the plane home, the second one was finished shortly afterwards and the set made its way to my best friend Emma, where they are currently being loved and warn. (a lot more than they would have been if they stayed with their maker!) - not that I don't like them, I do, I just have a lot of hats...

The pattern itself alternates rows of stocking stitch, from one right side to the other in rows of four. Which creates the ripple effect, and I was a little dubious of it to start with, but did slowly fall in love with it as I knitted along.

Safe to say this was the first hat that I knitted, and I don't think it was perfect (far from it) and some of the decreasing is slightly dodgy, but it shapes well, and suits Emma's head - yay!


Sunday, 14 January 2018

Mr M's Christmas Socks

After the success of my first pair of socks, the next thing was to try and make a pair for Mr M. I used the same pattern as before from Love Knitting, and used the bigger size, which worked well for his bigger feet! The only problem was measuring his foot to get the right size without giving it away... But I managed that, he didn't seem like he knew he was getting a pair of socks for christmas when he unwrapped them, so either I was successful, or he just didn't want to hurt my feelings... I'll just pretend it was the first one...

The wool I used for this lovely pair was a Drops Delight wool, in their Red/Orange/Grey print from Wool Warehouse. (A lovely place to get wool and some attic 24 patterns) This pair knitted up a lot quicker then my first pair (naturally), and I did continue to use five double pointed needles (DPNs). For my next pair however I am going to be trying a circular needle, and may just learn how to knit two socks at once! But that is a little way into the future and just an ever-so-slightly scary idea. But I'll get there.

Now Mr M is proudly pottering about in his new socks. You never know, next year he might get a jumper (or another scarf...).


Sunday, 7 January 2018

Two-Tone Scarf

It's been a while since I last posted, with going away for the christmas holidays and the getting back to normal life afterwards. But! I did manage to get a few projects done!

This twin tone scarf has been something I have wanted to make for a little while. The scarf is knitted on a circular needle, and involved a tubular cast on, and an odd little way of knitting it, to get the effect of one colour one side and a different colour the other.

The pattern was another one that I had in my "Bumper Book Of Knitting" the book gave instructions on how to tubular cast on, as well as cast off. But I will admit I found the book instructions for casting off very hard. I did find a handy tutorial on Purl Soho, which explained that really it is Kitchener stitch, which I have used for sock toes, so all was well.

I did mess up the cast off a little bit, and will have to finally try blocking to get the scarf looking its best, but overall I'm pleased with it. It did keep me nice and warm on our family holiday to Germany!

Tuesday, 21 November 2017

A Heart to Mend Friendships

This was a little pattern that I found whilst scrolling through Pinterest. It was a crochet pattern, but one of the picture ones, and I thought I would give it a go with a little wool from the stash.

The pin that I read the pattern from can be found here, I also believe that the written pattern can be found on Ravelry (a link to that website is in the sidebar) but I'm not sure where on Ravelry.

I did really enjoy making this little heart. This one is now on it's way to a new home, but I might make a few more and find a cute project to put them into.

Sunday, 12 November 2017

SOCKS!!!

I have finally made my first pair of socks, and I can say, I love them!

I also loved making them. I know that some people say they are confusing and complicated, and in some ways they are. But if you manage to get your head around what the pattern is asking you, it gets easier.

For this pair of socks I used a pattern from Love Knitting, as well as selling wool and needles, they do also sell patterns, and the pattern for these socks are free, and can be found here.

I used a similar wool and needles that it specifies in the pattern. That is five 2.5mm double pointed needles (DPNs) and some sock wool, which is 4 ply. The sock wool I used was a Regia yarn, which is very much known among sock knitters as some of the best. I found a nice variegated wool in my local wool shop!

The pattern in some places was really good, and I could understand the first part. There were a couple of places, where I feel that if I had not of read a couple of other sock patterns, I wouldn't really know what to do.

When knitting the heel flap, one stitch is knitted and the next one is slipped, as you go along the row. What it doesn't mention is that the stitch that is slipped should be slipped purlwise. The other thing that I found really quite confusing was when I had finished knitting the heel flap and was starting on the heel gusset (which is a bit that joins the heel to the rest of the sock so you can carry on knitting). When the pattern says " Pick up 1 st at top of gusset" it means, so pick up a loop from the gap between the two needles, and make another stitch. This means that there will be one more stitch on the needle. It is then used to help decrease stitches as you decrease the gusset.

Also at the end of the section "picking up stitches for the gusset" you should have 16 stitches on needle 1, 16 stitches on needle 2, and needles 3 and 4 need the heel stitches shared equally between them, with the middle of the heel being between the two needles. You can end up there by following the pattern, but it does get ever so slightly confusing.

Apart from the few confusing parts, the pattern is good, and gives quite a nice looking pair of socks. And like I said at the beginning I am in love with mine, and may have to make some more for some christmas presents, for other people, or maybe just for myself...


Sunday, 29 October 2017

Birthday Scarf

Recently it was a good friend's birthday, and I had nothing on the needles and was feeling the itch to get knitting again.

So I made this chunky ripple-y rib scarf, it's a pattern that I have used for three other scarfs so far, and it is great!

The pattern itself is from the blog The Wool Nest and the very first scarf I made with it, I followed the pattern using similar yarn to the one used on the blog and created a very similar scarf for Mr M (one of the first things I knitted for him).

For this scarf I took a trip to the small wool and fabric shop on the high street and just went searching for some nice chunky wool. What I ended up with was the Hayfield Chunky Tweed, one in a light blue and another in dark blue. The tweed style of them gives little hints of colour here and there and I love it.

The scarf is a rib with a twist and it makes a lovely scarf that I would recommend for anyone. It has now been posted off to it's new home, where I hope it will have a happy and loved life!

Monday, 2 October 2017

Cozied Up

And just in time for winter it's finished!
I had started this scarf a while ago when I made one for Mr M, which you can have a look at here, along with the pattern.

I made this one with the yarn that I had leftover from making Mr M's football scarf, and thought I would make one for me, being a WRU supporter I took advantage of the colours being the same!

Now it is finished just in time to snuggle up for the winter, although we do look a little like tweedledee and tweedledum when we are both wearing them, but oh well...

In other news, my friend Slade has a blog called All About That Space, which, as the name suggests, is, all about Space! So if you want to catch up with the goings on in the sky, or just want to have a little read, go check it out.

Wednesday, 6 September 2017

Nicky's Blanket

Everything has been go, but I have managed to get at least one project done this summer! This is Nicky's knee blanket, it may be slightly larger than a knee blanket, but it will certainly keep him warm.

This blanket I've had to keep quiet about when I was making it, as Nicky didn't want to see it before it was made. I've loved making it, and luckily Nicky loves it too.

The blanket was made from a pattern in a book for a baby blanket. It is a simple granny square blanket and was made by just adding more and more rounds. Instead of using the suggested three balls of yarn, I think I did actually use seven... My plan was to make it bigger then a baby blanket, but didn't really think it would be this big.

I used two balls of dark green, two balls of petrol blue and three balls of the pale green colour. I started the centre of the granny square with the pale green colour.

The colour is swapped every two rounds. The centre was the pale green, I then used the dark green, then another two rounds of the pale green, and then two rounds of the petrol blue. Doing it this way gave it a lovely striped pattern and the pale green made sure that the colours of the other two colours didn't drown each other out. But it does mean you use another balls worth of wool.

So in all I made a blanket big enough for a grown man, out of seven 100g balls of DK wool.

Safe to say I think he really likes it. (And yes I did give it to him in a pub.)

Sunday, 21 May 2017

Legwarmers!!

They are here at last! The lovely leg warmers I promised.
They were made with double pointed needles and worked in the round, the two I've made are the inverse of each other and where I have started with one colour on one of the leg warmers, I started with the other colour on the other legwarmer. But this pattern is written for a lovely matching pair!

Each leg warmer is 15 inches long. My tension square was 3 3/4 (three and three quarter) inches by 3 3/4 inches, with 20 stitches and 17 rows, kitted in single rib, with DK wool and 3.75mm needles.

The pattern can always be adjusted to suit different sizes, by increasing or decreasing the number of stitches can adjust the size of the legwarmer, and by adding more or less rows can change the length.

The legwarmers themselves are kitted in single rib with DK yarn.
The pattern alternates different coloured yarns, but you can ignore the change of colour and knit a set of legwarmers in one colour, or use a variegated yarn.

Repeat the pattern twice to make two legwarmers.

Needles: 
A = 4 x 3.75mm double pointed needles.
B = 4 x 4mm double pointed needles.
Yarn A - this is the colour you start with.
Yarn B - the second colour you have chosen.

Pattern:
Cast on 60sts on 3 needles (20sts on each needle) with needles A and yarn A.

Place a stitch marker between the first and second stitches, this will indicate when to change colour later on.

Row 1: With the fourth needle and yarn A: (k1, p1) to end of round.

** To begin with you will have three needles in a line, to begin the first row, with the fourth needle, knit with the first needle in your left hand, make sure you pull this stitch tight, and then the three needles will have formed a circle. Having the stitch marker between the first stitch you knit and the second one will help when changing colour.

Row 2: (k1, p1) to the end of the round.

Row 3: k1, change to yarn B, (p1,k1) to the end of the round.

Row 4: (k1,p1) to end of round.

Repeat rows 3 and 4, changing the yarn colour every two rows. (The coloured stripes should be two rows thick, but the very first stripe will be thicker as you have cast on.)

Continue until the work measures 2 inches long, then change to needles B.

Continue with needles B until the work measures 13 inches and change back to needles A for another 2 inches.

Cast off.