Sunday 26 February 2017

Mini: Engine Building

Lined up after the Eurofighter kit was this lovely Mini Cooper Mk.1 kit. I do like classic cars and the Mini is one of my favourites. This kit is made by Revell and is 1:24 scale. 

The first step is assembling the engine, which is tiny and fiddly, but with thumb nails and a truck load of patience I got it sorted, and painted! 

As you can see from the photos the engine isn't properly completed yet, there is still a piece to sit right on the top, which is why the red stops and there is a rather unsightly lump of unpainted plastic on the very top of my engine.

For the paint I used enamel, black, gray and red. I used red gloss for the main engine block and grey and black for the other parts.

Front.

Back.

Wednesday 22 February 2017

A Little Bit of Bunting

Yet again I had another idea of what to do with my leftover project scraps, bunting! 
I find it cute and can be permanent or brought out for a special occasion. 


For my triangles, I used double knit yarn and a 4mm hook, although this really can be done with any sort of yarn and any hook!

Pattern:

Chain 2

Row 1: 2dc in second chain from hook, 1ch turn.
Row 2: 2dc in each dc, 1ch turn.
Row 3: 2dc in first dc, 1dc in every remaining dc, 1ch turn.

Repeat Row 3 as many times as needed. 

There is no set size to bunting triangles, they can be big, small, or all different sizes! I prefer all my triangles to be the same size, so when making them I've been comparing to other triangles that I've made so they all look the same size, even if the yarn is a different weight.

With all of your triangles made there are a couple of ways to put them all together in a string. The method I prefer is with ribbon. I have folded the ribbon in half and pinned it together and at intervals placed a triangle between the two sides of ribbon and then sewn the edges together, but I would suggest only doing that if you have a sewing machine, as a line of bunting can be quite long! 

The other option is to crochet a line to put them onto, this can be done by crocheting a string of a few rows and sewing the triangles on, or when chaining the string, chain into the top of the triangles, then work a couple of rows to give the string more strength.

Monday 20 February 2017

Shells and Chains Crochet Snood

Recently I decided to try out a new crochet stitch, and to use up some of my sneaky yarn stash, which is getting increasingly bigger!

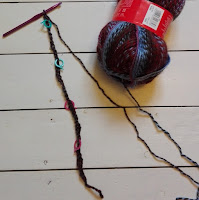
Foundation chain with stitch markers
to help keep count
So I came across the shell and chains pattern and it is a crochet pattern with shells, but is not as tight, and a bit more hole-y then the normal shells pattern. I used a chunky and variegated yarn from my stash, as it looked the nicest to make a snood out of. Although from this experience I don't think that a variegated yarn is the best for this pattern!

I started off with a chunky yarn and a 6.5mm hook, but this pattern can be done with any yarn and the appropriately sized hook.

The foundation chain should have a multiple of 6 chains and then another two.
I have chained 50 (8 x 6, + 2), this gave me a snood which is 125cm long which I have sewn together at the ends to create the snoodness.
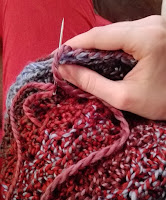
Row 1 Complete
Here is the pattern:


Chain 50

Row 1: 1 dc in 2nd ch from hook, *miss next 2 ch, 1dc, (1tr, 1ch, 1tr, 1ch, 1tr) in next ch, repeat from * to the end of the row then turn.

Row 2: 4ch, 1tr in first stitch (The 4ch counts as one treble crochet and one chain), miss next tr, 1dc in next tr (this is the centre tr of the shell), *(1tr, 1ch, 1tr, 1ch, 1tr) in the next dc - between the shells - miss next tr, 1dc in centre tr, repeat from * and end with (1tr, 1ch, 1tr) in the last dc and turn.

Note: I found when chaining 4 for the second row it helped to keep a stitch marker in the third chain, which acts as the first treble, then I know without confusion where to end the third row!


Stitch marker in third chain
Row 3: 1ch (this doesn't count as a stitch!), 1dc in first tr, *(1tr, 1ch, 1tr, 1ch, 1tr) in the next dc, miss the next tr, 1dc in next tr, repeat from * until end, once the last dc has been made, 4ch for the next row.

Repeat rows 2 and 3 continuing the pattern.

For my snood I used a whole 200g ball of chunky wool, but the work measured 125cm (49 in), which is plenty long enough for a snuggly snood for a woman. By repeating row 2 and 3 you can create the snood as small or as large as you wish.

Once the snood is to length, cut a large tail from the ball, and pass it through the last remaining loop to fasten the work. Use this long tail to sew the two ends of the snood together, or if you wish make the pattern long enough to make into a scarf, then you can keep the nice scalloped edge you have created.
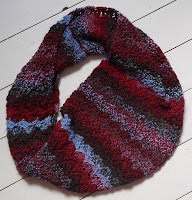
Finished Snood
Sewing the ends together
From my experience making this snood, I do not think that using a variegated chunky yarn is really the best way of bringing out the shape of the pattern, this I think would be done much better by using a thinner plain yarn, like double knit, and perhaps even changing colours each row. But we live and we learn!

Friday 17 February 2017

Striped Scarf

Mr M in his scarf
A little while ago, Mr M asked me to make him a scarf for his football team. So I set about finding the right wool, and thinking about how to actually make the scarf.

I decided on using double knit wool, so the scarf wouldn't be too thick, and I used a single rib stitch. The end result was a nice scarf with the desired effect. Bellow is the pattern.

In the pattern there is an interesting finish to the edge of the scarf (sl 1 pwise wyif), this gives a smooth and neat edge to the scarf, I tend to use this when I need to create something in which the edges are most likely to be seen. The abbreviations here can be looked up in the abbreviations page in the side bar.

Here is what it actually means:
So the k1, p1 stitch is done until there is only one stitch left in the row, then like you would if you were doing a purl stitch, bring the yarn to the front of the needle. Then put the needle through the front of the stitch (like a purl) and slip the stitch from the right needle onto the left, and there you have finished the row! The stitch will be the first to be knitted on the next row, so it does not need to be worried about.
Yarn in front of needle
Needle through front of stitch
Finished row

Pattern:
Size 7 and size 9 needles (UK)
200g of DK wool
100g of colour A
100g of colour B

With size 7 needles cast on 50 sts with colour A

Row 1: (K1, P1) to last st, sl 1 pwise wyif.
Repeat row 1 for three more rows, change to size 9 needles.

Row 5: (K1, P1) to last st, sl 1 pwise wyif.
Repeat row 5 until you have 28 rows in colour A,

Switch to colour B and knit 24 rows of:
(K1, P1) to last st, sl 1 pwise wyif.

Repeat knitting stripes of 24 rows until you have 21 stripes

On the last stripe, when row 24 has been reached, switch to size 7 needles.
Knit four more rows of:
(K1, P1) to last st, sl 1 pwise wyif.

Cast off.

Tassels:
Tassels are optional in this pattern but I have included them on the scarf for Mr M, so this is how I've made them.

I started off with the two ends of the remaining yarn. In my tassels I've used both colours, but you can use only one colour if you wish, but you will have to wrap the yarn twice as much to get the same amount of tassels. I wrapped the yarn twice around my hand, cut it off the ball at the bottom, then along the same place as the ends, cut one side of the loops.

When wrapping the yarn you can wrap it around anything that has two straight edges if you don't wish to use your hand. By using something else you will be able to vary the size of tassel you make and if you are making multiple tassels then you will be able to ensure they are all the same size.

Now you should have four longish lengths of yarn, which are folded in half. With the top end of the tassel (the fold) pull it through a stitch (but not all the way) on the very edge of the scarf at the end. Once you have pulled the tassel part way through the stitch you will have a small loop on one side of the scarf and the tails on the other. Pull the tails through the loop and pull the tails so they tighten the loop around that bottom stitch. Now the tassel is attached.

On my scarf I have made 13 tassels and tried to equally space them along the bottom of the scarf, although if you made 25 tassels you would be able to place them at every other stitch along the bottom of the scarf. But the number of tassels and where you attach them is entirely down to your preference.


Wednesday 15 February 2017

Crochet Magic Rings

Magic rings are something in crochet that I have struggled with for quite a while, and I've now finally got it all figured out and I feel like I need to share this.

Being left handed, I also crochet left handed (but knit right handed - go figure) which can get confusing when looking at pictures of what to do and having to flip them around!

First Step Left Handed
First Step Right Handed
So the first step is to loop the yarn around your hand (the one that you don't hold the hook in) like this:

This image is left handed, but I have flipped the image so it is right handed and also put it up, so that if anyone does get a little confused you can work it all out!

Step Two.
Then the hook should be fed under the yarn tail above the cross in the yarn. It helps to put your thumb over the cross so it all stays in place. Then grab the other loop of yarn and pull it under the tail piece.
Loop yarn pulled under the tail piece.
dc's along the ring and tail.
With this loop, chain one and that becomes the first stitch in the magic ring. I tend to put in a stitch marker on this stitch so I know where the begining of my round is when starting off a project with a magic ring. So to finish the magic ring off, double crochet (or what the pattern says) along the magic ring, around the loop and the tail.

After the double crochet's have been done and right number of stitches in your magic ring has been reached, the tail that is left sticking out can be pulled tight to create the ring.

The great thing about magic rings is that when they are pulled tight there is no hole in the middle of the ring, which you do have if you try and make a circle by chaining six or so and slip stitching them together.

Because of non-holey-ness this is often used in patterns and until recently I have been guilty of skipping the pattern if it has got a magic ring in it! But now I feel like I have mastered the magic ring, and now have the chance to take on any pattern I feel like.

Finished magic ring with hook through first stitch


Monday 13 February 2017

Dumpling Kitty

This was a little project I started a little while ago just to try something new, I've made hats and gloves before but never a cat!


I had decided that I was going to make a small animal, so I went trawling through Ravelry. Which is a brilliant site for patterns and ideas!

I found in the end this adorable pattern for these Dumpling Kittys, as they are known, by Sarah Sloyer. The pictures of the ones she has made are just adorable and I wanted to make one, because who doesn't!


So the little kitty cat has his body made in two parts and crocheted together, and then little feet and tail are put on afterwards.

It's well known that when you do something for the first time it doesn't always come out the way you want it, or the way you expect it to, and probably due to my relatively loose tension when crocheting and knitting, my little cat is rather large, and not particularly dumpling shaped! I also managed to not read the instructions on sewing the feet on properly (my bad!) and his little paws are rather far apart at the front.

But apart from his little making mistakes he is cute, and I just love him!

Saturday 11 February 2017

The Finished Thing:

The Eurofighter is finished! YAY!

For the first try at painting and finishing properly, I don't think it looks too bad.

The matt varnish gives the effect I was looking for - military aircraft aren't usually shiny! - and if you don't look too closely the paint is okay (only a little wobbly in a few places).

Having never put transfers on a model before I can agree with Mr M that they really do add a large amount of detail for not much effort. They give the model a sense of completeness and makes the whole thing look a bit more real, even in miniature!

Even with my dusting mistakes with the varnish, it has given the wanted effect and only in the small cracks where the varnish had pooled was there any discolouration from too much varnish.

All in all this is a nice turn out to this model, and I'm a little proud of it!

Read more about it's progress here:
Putting the transfers on
Varnishing


Starboard Side

Nose Detail

Body Detail

Thursday 9 February 2017

Varnishing The Eurofighter: Enamel versus Acrylic

The time has come for me to varnish my Eurofighter, which I did. But first of all I had to figure out what kind of varnish I would need. This was not as easy as I first thought, as I was confronted with forums upon forums of people arguing that acrylic varnish will ruin everything and enamel is the best and vice versa!

So after a bit of reading up on what is actually in acrylic and enamel varnish, and on how they react with different things I made a decision.

Taped up ready for varnishing
I've painted the Eurofighter with acrylic paint, which is water based. But, most of the other model paint I have is enamel, which is solvent based (why it's more smelly!). So as it turns out the difference between acrylic and enamel varnish is very much the same (Although rumors are there are some varnishes that are labeled as acrylic but are solvent based). The problem comes when the paint under the varnish hasn't dried properly, with acrylic paint you're waiting for the water to evaporate and with enamel the solvent needs to evaporate. So if acrylic varnish has been put over enamel paint before it has had long enough to dry, the solvent will try to evaporate and cannot, and will blister up the varnish layer and then you have to get back to paint stripping and starting all over again. But the same can be said for the opposite way around.

There is a huge camp on either side of the fence here, some people will always use acrylic varnish on EVERYTHING, and the same with enamel varnish. So without being influenced by who is shouting the loudest, it is really down to personal preference. I used enamel varnish, but had waited a few months (not deliberately, but I hadn't got around to it) after painting and a few days after putting the transfers on, to make sure they had dried out properly, before I went putting the first coat of varnish on.

The Eurofighter has now had two lovely coats of matt varnish, and is starting to come together and look quite smart.

Underside with a fresh coat of varnish
One of the things I didn't do before I had taken the varnish to my little aircraft was to clean it of the dust and little bits that had accumulated on it, which Mr M told me wouldn't be a problem - using an aerosol meant that the dust would be blown off. Which sadly wasn't the case for me, and now I seem to have varnished in the dust so it now is permanent, oh well, learn for the future it seems.

Tuesday 7 February 2017

Granny Stripe Blanket: Scraps and a Hack

For a little while now I've been collecting large lengths of yarn left over from other projects I've finished and balls of yarn that have died, and I've been crocheting them into a blanket.

Blanket and centre pull ball

I decided to try out the granny stripe blanket, I'd seen a few other people do them and they looked really nice. So to try and figure out where to start I had a look at the lovely pattern on Attic24, which is a lovely lovely place to find new things, so go check it out in the link!

What I love about using scraps in this project is, there is no obvious pattern and the colours are random and can come out looking lovely. The beauty of using scraps as well is, you don't have to spend out on yarn especially for it, and there is a lovely feeling of looking at it and seeing all the different bits of projects that you had enjoyed doing before, and it's all brought together in one cozy blanket.

After I got to the end of this little centre pull ball, I thought of an easy way to stop the thing coming unravelled. Years ago I had bought these tiny little hair clips, obviously in a moment of madness. They never stayed in my hair as it is a huge, thick tangled mess most of the time! But once I have used a stitch marker to hold the last loop where I had been working, clipping the tiny hair clip on the end stops that sneaky end trying to pull back through and undo all that work.

My little hair clip hack

Sunday 5 February 2017

Balling Scraps

In my square making frenzy for the Periodic Blanket, I started to make another multi coloured square and sadly discovered when the yarn ran out in my hand that I didn't have enough to finish the square.
I did however have enough yarn to make a neat little centre pull ball to use in another of my scrap projects! So I thought I would explain how I go about this without the expense of buying a little ball winder.
Toilet roll tube with small cut

All that is needed for making the ball is an old toilet roll tube - a kitchen roll tube or something of similar size should work just as well!

I then made a small cut in the end of the tube, this cut then holds the end of the yarn and this will be the centre. Once the end has been slotted in place the winding can start.

By holding the yarn a little way down, wind the yarn three times around the tube, then, turn the tube a quarter turn in your hand, and wind the yarn another three times. Repeat turning the tube a quarter turn and winding three times until the very end of the yarn.
First three windings

By the end there should be quite a mass of yarn on the tube. Once you have the outer end of the yarn tuck it under one of the previous windings to keep the ball from unravelling. The newly wound ball can then be slid off of the tube. Once off the tube it can be squished into shape.

Now there is a nicely wound ball of wool, which when used can be used from the middle without rolling away, and which looks neat and cute in your yarn stash!


Second three windings at a quarter turn of the tube

Fully wound and with the end tucked in

Fully wound ball off the tube and squished into shape


Friday 3 February 2017

Periodic Squares

For a long time I have wanted a patchwork quilt, I also am a sucker for science and used to have a passion for chemistry. So a little while ago I started to create a blanket.

Blanket Pieces Laid Out

For this blanket I have knitted squares, I intend to then so them together and on each square I shall sew on the correct chemical symbol. Progress on this blanket has been very very slow, but today I finished another square, which is one more on the way to the finish. But also, I realised I had no record of what squares I had knitted... I had previously written a chart of the periodic table which I had free handed, and looking back at it I had no clue what was going on and what I had done already. (Some squares were crossed out and others scribbled here and there).

Old Chart and New Chart
So I sat down and I drew out another chart, this time using squared paper and created a second chart that was neat and understandable.

Then was the task of sorting the squares into colour and seeing what bits of the blanket had been done and what was left to do.
Very satisfyingly I was neatly crossing things off the chart and there are now a nice amount of crosses in the boxes.

One of the things I failed to take into account was my eagerness to get the project started when I first settled on the idea, meaning that I have a partly completed blanket that hasn't been knitted to the same pattern. For the majority of the blanket I have been knitting the squares diagonally, in a diamond shape, this means that the square doesn't pull awkwardly in the blanket and it all lies nicely. But in the first column of my periodic table, my squares have been knitted straight and to varying sizes...
Oh well, I will see how this all looks in the end, then I may have to redo some of the start.

The pattern I've used for the square is a simple garter stitch pattern I have explained here: Square Pattern

For my squares I have used size 9 (3.75mm) and all of the wool is double knitting. Each square doesn't take much yarn to produce and one 100g ball gives quite a few squares.

Square Pattern

This is the pattern I use for creating my squares.

At the bottom of this post is the pattern that I have written for the square. The paragraphs before explain how I have gone about following the pattern to create my square.

In this pattern I am using size 9 (3.75mm) needles and a double knit yarn. The particular yarn I'm using is a variegated, Hayfield yarn that I found in my local Hobbycraft, nothing too special!
The final square measures approximately 16cm x 16cm, but that can vary due to tension, needle size, and wool weight used.


To start with I have cast on two stitches and knitted them as a row.

The second row I am going to start to increase the stitches, and I am going to increase one per row, until I have 40 stitches.
In each row the first stitch is knitted normally, then the second stitch is used to increase. This makes the outer edge of the square less loopy and more neat.


Increasing First Step

Increasing
There is not a set way to increase each row in this pattern, but this is the way that I increase my squares, which looks neat.


The first step is to insert the needle into the next stitch, yarn over and pull it through (Shown in the picture) this is the beginning of a normal knit stitch. Instead of sliding the yarn off the left hand needle, slide the newly made loop onto the left needle along side the stitch you just made it from.

Now there is another stitch on the left hand needle. The newly made loop is treated as another stitch and the loop and its parent stitch are knitted along with the rest of the row.
Newly made loop next to the parent stitch


Once I have my 40 stitches (one per row), one half of the square has been done. To create the other side of the square each row is decreased by one, until there is only one stitch left.

Decreasing
To decrease on the second half of the square, the second and third stitch of each row are knitted together.

When decreasing, knit the first stitch of the row then knit the next two stitches of the row together to form one stitch.

To knit them together insert the needle from front to back through both of the stitches, yarn over the needle and pull it through both stitches like you would if doing a normal knit stitch.

Continue this until there is only one stitch left on the needle, pull this stitch into a loop. Cut the yarn from the ball and pass the end through the loop before pulling it tight to effectively cast off the square.
Decreasing: needle inserted through two stitches


Written Pattern:

Cast on 2,
Row 1: k to end of row
Row 2: *k1, inc1, k to end of row
Rep from * until you have 40 sts
Row 38: *k1, k2tog, k to end of row
Rep from * until you have one stitch
Cast off

A list of the abbreviations is included in another page on the blog. Pages can be found in the right hand bar.

Happy Knitting!

Completed square and half done sqaure

Thursday 2 February 2017

Eurofighter Progress

Starting posting about a model most of the way through building it is probably an odd one. But I am proud of this model. It is the first model that I have cared enough to do properly, and it has taken a while to get here.


So for the first time, I've put transfers onto a model, instead of just painting it and hoping for the best. In terms of first tries, I'm pleased, all the transfers came out well, and are positioned in mostly the correct place. I'm currently waiting for the transfers to properly dry out before I go about varnishing the aircraft. Which will be another first. 

I did have to ask for the help of Mr M on this one. The lovely instructions for the transfers simply stated "soak in water and apply to model" which although I understood, wasn't sure of how to go about exactly "soaking in water" and "applying". In my field of work you do everything to the manual, this wasn't helping the perfectionist nature in me!

But with advice from Mr M, who told me in the end everyone has their own way of doing it, and "I guarantee you will mess at least on of them up", which of course I took as a challenge, I did them all. And without hiccup I may add Mr M. 

Cockpit and Canopy with RAF roundel.
Tail, along with serial number and other markings.

Before adding the transfers the pedant in me decided to do the research. I knew that the Eurofighters were flown by Number 29 squadron. One of my lecturers has great joy in telling me the same story over and over again about them. But it was obvious that this roundel was not, Number 29. I soon found out it was Number 17 squadron, which also was a Eurofighter test squadron.

This lead me on to the serial number of the aircraft, ZJ928, and much to my surprise (and enjoyment)  this aircraft was a Eurofighter and had previously been in Number 17 squadron. Very nice.