Showing posts with label Variegated. Show all posts

Sunday, 1 July 2018

Arm Knitted Snood

This knit was quite a bit of fun. I had been given a lovely lovely snood, which was arm knitted for me by a lovely friend and for a long time I had wanted to try it myself. So I did.

This time I used leftover yarn from a 200g ball that I got when I made my Walrus Hat. It is a chunky, 100% acrylic yarn, that is a variegated brown colour.

I thought that the knit would be quite thin, so it would be best to double up the yarn, which I did by pulling from the inside and the outside of the ball. It did prove quite a challenge actually finding the inside of the ball, but we managed...

The snood I really did make up as I went along and I applied the normal knitting technique to what I was doing. Arm through the loop, pick up the yarn, pull it through.

You cannot however, turn your arms. So the effect, especially if you just knit, is not garter stitch, as would be on a normal piece, but stocking stitch. I knew this would be the effect, and I liked it to be that way. I could have tried purling with my arms, but that might have been a bit awkward. I didn't actually try it, so it might not be - We'll find out next time.

I arm knitted until I felt the work was a decent length, before casting off and cutting a very long tail. As the work is so large I also sewed the two ends together using my hands which worked quite well.

All in all the piece took me about 20 minutes to make. It is a very very speedy and easy knit. The fabric it produced was thinner then I thought but it would make a nice light snood. Next time I might try a much thicker yarn. Perhaps double up on super chunky yarn, or try out these new specially made arm knitting yarns.

I am pleased with what I have made, and may well make another one in the future, given that I still have A LOT of this yarn left. I may make the snood a little bit longer too. Or maybe I'll make something completely different to a snood! But that is to decide another day.

Sunday, 17 June 2018

Emma's Socks

My good friend Emma asked me if I could make her a pair of socks, in the wake of me making a pair for Mr M and for Mam. Of course I said yes, and she was lovely enough to buy the yarn for me.

I wanted to try a sock in a different way to the normal, cuff down with a heel flap and gusset, that I have been making up until now. So I googled how to knit a sock toe up, because why not give it a go! In all my googling and reading I came across a website called The Spruce Crafts. It gave some general instructions on how to knit a sock toe up, including links as to how to do a turkish cast on, and a short row heel.

I did a little research into how to do turkish cast on's, as at the time I was away on holiday, sat in bed in the evening, with one set of DPNs and my yarn. Mr M got slightly irritated with the complaining of how exactly I was going to cast on, but I worked out a way! (and a video to come hopefully so - watch this space!)

Anyway the first Cast-On-Hurdle was overcome and I was back to knitting! I cast on 64 stitches for this sock, as I had made socks with that many stitches before, and they were slightly large on my feet, but Emma's feet are wider, so it was a safe bet. With these socks I mainly referred to the website for the casting on and for the heel. The rest I was fairly confident that I could work out myself. :)

Increasing for the toe was mostly the opposite of decreasing for the toe, and was fairly easy, and knitting the length of the foot was a doddle. One thing I did have to look up was how much room to leave for knitting the heel. I had measured Emma's foot before making her socks, and had an overall length I wanted them to be, but I found out when to stop on the Spruce Crafts website.

I did get rather confused knitting the heel, but following the links to a more in-depth page on the Spruce Crafts website got me through it, and there are only a few holes...

I'm really not sure why there were holes in my heel, but I think with a little more practice I can get them less saint like! (any suggestions or tips on short row heels would be greatly appreciated!)

Carrying on up the top part of the sock and to the cuff was easy too. I did the top of the sock at 13 cm long like most of my other socks, followed by a single rib cuff an inch tall.

Casting off was interesting. It was only until I came to casting off did I realise that the socks would need a stretchy cast off to be able to go around the foot when putting them on. People do tend to take socks on and off... I followed the instructions for the cast off on the Spruce Crafts website, but I didn't like the look of it, to I took it out and went on the search for another cast off that I liked better. In the end I found Jeny's Surprisingly Stretchy Bind Off on Knitty.com. In my opinion it looked so much better, and the step by step pictures really helped get my head around what I was meant to be doing.

The yarn used on the socks was a Regia yarn, from the Arne and Carlos Design Line in the Bramble colourway. The way it patterns really pleases me and I love them. I really do need to try their Pairfect yarn at some point though!

The socks did turn out well and they were loved from the minute Emma put them on her feet for a photo. Luckily they did fit too! I have to admit I did have a little bit of Second Sock Syndrome when making them, and the second one did not get cast on for a little while. But they got finished in the end and all was well.

Sunday, 15 April 2018

Cabled Mitts

I was looking for a challenge recently, 
and I decided that I wanted to try something new. I came across this lovely cabled mitten pattern on Love Knitting called Nalu Mitts by Leila Raabe. 

They are a simple pattern for fingerless mittens, with a nice cabled section along the back of the hand. 

I decided to use some yarn out of my stash. It was a blue-y variegated yarn, of a DK weight. DK is the yarn weight that is used in the pattern, although it uses a lovely pale grey colour which really suits it, as well as a set of 3.25mm double pointed needles.

Doing the cable along the back of the mitten was easier then I thought it would be. I am hoping that with a little more practice doing cables I'll begin to understand how they work and be able to use them in my own knitting.

The mittens knitted up really quickly, and despite all the mistakes, including knitting the wrong size thumb (oops!) they are pretty snug, and they look fine. 

Once I had blocked my mittens they then went as a present to my friend Emma, who was admiring them when I was knitting them. They knitted up quite quickly, and were fun to knit too. 

So they were a joy to knit, and seem to also be enjoyed by their new owner. 

Monday, 19 March 2018

Warm and Cozy

During the recent heavy snow in my part of England, I thought there was no better time to make a hat. This is a hat that I have been planning to make for a LONG time, and I have finally got around to it.

Years ago I got given a book of patterns for animal hats, (at the time I was always was wearing woolly animal hats, the monkey was my favourite!), unfortunately I never got around to making a hat from it. Now I wanted to make a walrus, and there wasn't actually a pattern for a walrus in the book, so I've had to make my own.

From the book I used the adult size pattern to make the basic hat, (it was a pattern for a chicken hat, but I left off the beak and comb), the rest of the hat I made up as I went along.

The hat is a basic woolly hat shape, has two tassels, which on the end of which are pom poms. I used a variegated chunky yarn for the main hat, that was a basic brown shade, but was a little more jazzy.

The cheeks, and tusks are made separately and sewn onto the hat, as are the eyes. The eyes are one white button and one black button each, sewn on in place with some black thread.

The tusks I knitted with an odment of white DK yarn from the stash, and the cheeks are crocheted, with a lighter colour variegated DK yarn. I made up the pattern for these two pieces and have included it below, for anyone who wants to have a go.

The hat, has a knitted lining in the ear flaps, and a fleece lining for the main hat. The book has the patterns for the lining and the instructions on how to do it. There was an option for a knitted lining to the hat, but I felt a fleece lining would be a little nicer. I might try a knitted lining next time.

Tusks Pattern (Make two):
On UK size 9 needles, cast on 2.
Row 1: Knit (and all odd rows)
Row 2; Kfb, K1
Row 4: K2, Kfb
Row 6: Kfb, K3
Row 8: K4, Kfb
Knit another 20 rows in garter stitch,
Cast off.

Cheeks Pattern (Make two): (all stitches are UK stitches)
With a 4mm crochet hook, chain 11.
dc in stitch 1 from hook,
dc in the next 8 chains,
3dc in last chain,
dc in the bottom of the 9 chains and slip stitch into first chain to create a round.

Chain 1, 2dc in 1st dc, dc in next 8 dc, 2dc in next dc, 3dc in next dc, 2dc in next dc, dc in next 9 dc.
2dc in next 4 dc, dc in next 9 dc, 2dc in next 6dc, dc in next 10 dc, 2dc in next 6 dc, dc in next 11 dc, 2dc in next 3 dc, dc in next 3 dc, 2dc in next 3 dc, dc in next 12 dc, slip stitch, cut and fasten off.

I appologise if this crochet pattern doesn't make much sense, I am a knitter really, and I struggled to write down exactly what I did. The outcome you are looking for is a long oval shape, it doesn't really matter how you get there.

Sunday, 25 February 2018

Scrappy Socks

The yarn needed to knit a pair of socks is a little bit less than 100g, and since most balls are either 100g or 50g, it does beg the question of what to do with the leftovers, so I decided that seeing as I have small-ish feet, I was going to make one small sock out of the left over yarn from each pair of socks!

The sock pattern I've used is the same one that I used to make my original pair of socks, as well as the ones for Mr M, the link to it can be found on those blog posts. I modified the pattern so that it was an ankle sock, just by taking out the rows in stocking stitch before the heel flap is knitted. This means that you will knit an inch of double rib for the sock cuff and then go straight into knitting the heel flap.

The one thing that I did do differently with this sock is to knit with only 60 stitches in the round, instead of 64. I found my last pair of socks, ever so slightly to baggy, but these fit like, well, a sock! I also swapped down to a 2mm circular needle, instead of 2.5mm double pointed needles, and the only problem I encountered was that I forgot that, smaller needles meant smaller work, and that included the length of the sock... My measuring I think was also out, but luckily I tried the sock on before I grafted the toe together! Oops!

I intend to make a few more little scrappy socks, the next one will be the leftover yarn from Mr M's Christmas socks! Admittedly this sock still left a fair bit of left over yarn. I think I will make a proper scrappy pair of socks with all the smaller leftovers from various socks. But first I'll learn how to knit two socks at once on the same needle... That will be fun!


Monday, 5 February 2018

Snowball Beanie


The other day I came across a lovely looking hat on pinterest, and as the stash was becoming slightly out of control I thought I would try it! The pattern was a free pattern on Left In Knots, and is also available to buy on Ravelry.


I managed to make the hat with two 50g balls of what I think was double knit! And the adult size hat looks like a small size, but does stretch out nicely.

It's made by crocheting the band of the hat in rows, before working the top in the round, which grafts onto the band.

The hat took me a couple of days to make and did grow very quickly. The pattern online gives the instructions on how to make the hat and does give a few ideas for the bobble on the top.

For my bobble, I made a pompom, as in the photos on the pattern, but the pattern doesn't give instructions for how to make one, but it was something I have done before.

To make pompoms you need two rings, you can buy pompom makers, which come in four parts and are very easy and quick to use, but I mocked myself up a pompom maker from on old cardboard box, that I think once held hammers.

The size of the rings made, will give you the size of the pompom, the bigger the rings, the bigger the pompom. The wool is wrapped around the two rings, keep on winding the wool around so there is a good thick layer.

Then cut the wool around the edge of the cardboard rings. This will allow you to wind a bit of wool between the two cardboard rings, tie it in a tight knot, and you should have what looks like a pompom, with two cardboard rings around the midde!

The pompom can be trimmed into shape (whatever shape you fancy, I went traditional sphere!), and then it is ready to attach to the hat. There isn't really a special way to attach the pompom, if you leave a long enough tail from tying the pompom it can be used to sew it onto the top of the hat.

The hat made a happy home with Mam, she loves purple, and she is always happy to have things made for her!

Sunday, 14 January 2018

Mr M's Christmas Socks

After the success of my first pair of socks, the next thing was to try and make a pair for Mr M. I used the same pattern as before from Love Knitting, and used the bigger size, which worked well for his bigger feet! The only problem was measuring his foot to get the right size without giving it away... But I managed that, he didn't seem like he knew he was getting a pair of socks for christmas when he unwrapped them, so either I was successful, or he just didn't want to hurt my feelings... I'll just pretend it was the first one...

The wool I used for this lovely pair was a Drops Delight wool, in their Red/Orange/Grey print from Wool Warehouse. (A lovely place to get wool and some attic 24 patterns) This pair knitted up a lot quicker then my first pair (naturally), and I did continue to use five double pointed needles (DPNs). For my next pair however I am going to be trying a circular needle, and may just learn how to knit two socks at once! But that is a little way into the future and just an ever-so-slightly scary idea. But I'll get there.

Now Mr M is proudly pottering about in his new socks. You never know, next year he might get a jumper (or another scarf...).


Tuesday, 21 November 2017

A Heart to Mend Friendships

This was a little pattern that I found whilst scrolling through Pinterest. It was a crochet pattern, but one of the picture ones, and I thought I would give it a go with a little wool from the stash.

The pin that I read the pattern from can be found here, I also believe that the written pattern can be found on Ravelry (a link to that website is in the sidebar) but I'm not sure where on Ravelry.

I did really enjoy making this little heart. This one is now on it's way to a new home, but I might make a few more and find a cute project to put them into.

Sunday, 12 November 2017

SOCKS!!!

I have finally made my first pair of socks, and I can say, I love them!

I also loved making them. I know that some people say they are confusing and complicated, and in some ways they are. But if you manage to get your head around what the pattern is asking you, it gets easier.

For this pair of socks I used a pattern from Love Knitting, as well as selling wool and needles, they do also sell patterns, and the pattern for these socks are free, and can be found here.

I used a similar wool and needles that it specifies in the pattern. That is five 2.5mm double pointed needles (DPNs) and some sock wool, which is 4 ply. The sock wool I used was a Regia yarn, which is very much known among sock knitters as some of the best. I found a nice variegated wool in my local wool shop!

The pattern in some places was really good, and I could understand the first part. There were a couple of places, where I feel that if I had not of read a couple of other sock patterns, I wouldn't really know what to do.

When knitting the heel flap, one stitch is knitted and the next one is slipped, as you go along the row. What it doesn't mention is that the stitch that is slipped should be slipped purlwise. The other thing that I found really quite confusing was when I had finished knitting the heel flap and was starting on the heel gusset (which is a bit that joins the heel to the rest of the sock so you can carry on knitting). When the pattern says " Pick up 1 st at top of gusset" it means, so pick up a loop from the gap between the two needles, and make another stitch. This means that there will be one more stitch on the needle. It is then used to help decrease stitches as you decrease the gusset.

Also at the end of the section "picking up stitches for the gusset" you should have 16 stitches on needle 1, 16 stitches on needle 2, and needles 3 and 4 need the heel stitches shared equally between them, with the middle of the heel being between the two needles. You can end up there by following the pattern, but it does get ever so slightly confusing.

Apart from the few confusing parts, the pattern is good, and gives quite a nice looking pair of socks. And like I said at the beginning I am in love with mine, and may have to make some more for some christmas presents, for other people, or maybe just for myself...


Wednesday, 1 March 2017

Mitred Knitting: Cushion Cover

Recently I was tasked with making a knitted cushion cover. I took this as a good way to try something new, so off I went to the library and trawled through a load of books on knitting (old fashioned I know, but I love the library!) and found out about mitred knitting, and I decided to make my own pattern for a cushion cover using different colour pieces of yarn to create a square pattern with a twist!

For those who are unfamiliar with the idea of mitred knitting, it's a way to knit several pieces of yarn together with little to no sewing the parts together.

What I found out was that there is a way to make about three different shapes, a big square, and L shape, a rectangle and a little square, all with the same base pattern.

The base pattern starts with the small square and the other shapes are done by repeating the pattern of the small square.
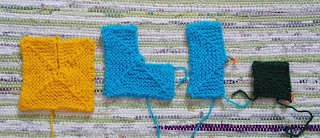
To start with one of the following shapes needs to be knitted on its own, I started with a small square as I found it easier but there are no rules as to what you can and can't knit! After one of the squares has been knitted, the next one is knitted, but when casting on loops are made through the edge of another square. This joins the two squares together, with no sewing.

The small square pattern is:

Cast on 19 sts

Row 1 and every odd row: k to last st, sl 1 pwise wyif. (The ending to this I've explained here in my scarf pattern.)
Row 2: k8, sl1, k2tog, psso, k7, sl1 pwise wyif (17)
Row 4: k7, sl1, k2tog, psso, k6, sl1 pwise wyif (15)
Row 6: k6, sl1, k2tog, psso, k5, sl1 pwise wyif (13)
Row 8: k5, sl1, k2tog, psso, k4, sl1 pwise wyif (11)
Row 10: k4, sl1, k2tog, psso, k3, sl1 pwise wyif (9)
Row 12: k3, sl1, k2tog, psso, k2, sl1 pwise wyif (7)
Row 14: k2, sl1, k2tog, psso, k1, sl1 pwise wyif (5)
Row 16: k1, sl1, k2tog, psso, sl1 pwise wyif (3)
Row 18: sl1, k2tog, psso, cut yarn and pull through last stitch to cast off.

To make any of the larger sizes the square pattern is repeated, so to make the rectangle the pattern will start:
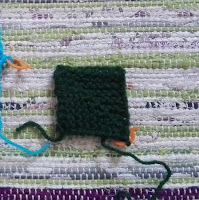
Cast on 38.
Row 1: k38
Row 2: k8, sl1, k2tog, psso, k8, k8, sl1, k2tog, psso, k7, sl1 pwise wyif.

The 'L' shaped size has three repeats, and the large square four in the style mentioned above. I find it easier when working a square made up of more then one little square, to put stitch markers every 19 stitches, so I can easily see where to start and finish the repeat of the pattern.

Now to actually join the the squares together the second has to be knitted onto the first, this is done when casting on, as loops are pulled through the edges of the first square. Lets say we wanted to add another small square to our first small square.
To start with cast on 9 stitches on your needle, the 10th stitch should be in the corner of the square. The next 9 stitches are pulled through the edge loops of the square, under the two pieces that make the neat straight edge:
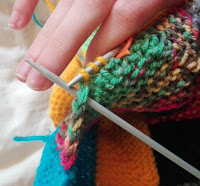
Needle passed under edge loops

When I'm casting on stitches through the first square, I always pull them through from the front, which means that the messy bit is at the back. To do this I find it easier to swap the needles over in my hands, and sort of knit the loops as if they were another stitch!

Most of the cast on rows that I knit onto other squares have a mixture of stitches both through the side of the previous square and just cast on to the needle.
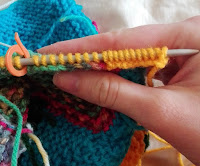
Both loops and cast on

With this style of mitred knitting a huge variety of different shapes can be made, and some really nice effects achieved. The cushion case I am covering is 20 inches by 20 inches, so I had a large square to try and knit. With my tension and using double knit wool with size 9 needles, the small square measures 2 inches by 2 inches, so I drew out on square paper a large square, which was 20 squares by 20 squares on the paper, and I drew out within that square the shapes and sizes of the smaller squares made using this pattern to make the large cushion cover size!

If you are planning to make something to a specific size like a cushion cover then it would be best to knit one square with the wool and needles that you plan to use, then measure the square and you then will have an idea of how many squares and how large you need to make the final piece.

The beauty of this pattern is that when making something larger, you can plan it out and stick to the design you've planned, or just grab the needles and wool and knit whatever you decide is best next, and all variations are easy to do, and the spontaneous nature of the project can be really fun!

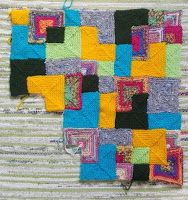
I haven't completely finished the cushion cover yet, but I am most of the way there, and with it laid out you can get a good idea of the finished product, I'm now excited to get it all done and put together.
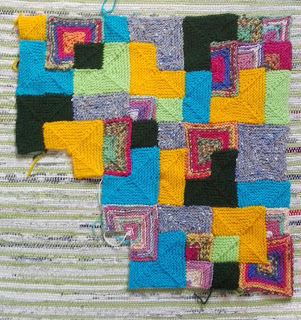
The Nearly Finished Cover

Monday, 20 February 2017

Shells and Chains Crochet Snood

Recently I decided to try out a new crochet stitch, and to use up some of my sneaky yarn stash, which is getting increasingly bigger!

Foundation chain with stitch markers
to help keep count
So I came across the shell and chains pattern and it is a crochet pattern with shells, but is not as tight, and a bit more hole-y then the normal shells pattern. I used a chunky and variegated yarn from my stash, as it looked the nicest to make a snood out of. Although from this experience I don't think that a variegated yarn is the best for this pattern!

I started off with a chunky yarn and a 6.5mm hook, but this pattern can be done with any yarn and the appropriately sized hook.

The foundation chain should have a multiple of 6 chains and then another two.
I have chained 50 (8 x 6, + 2), this gave me a snood which is 125cm long which I have sewn together at the ends to create the snoodness.

Row 1 Complete
Here is the pattern:


Chain 50

Row 1: 1 dc in 2nd ch from hook, *miss next 2 ch, 1dc, (1tr, 1ch, 1tr, 1ch, 1tr) in next ch, repeat from * to the end of the row then turn.

Row 2: 4ch, 1tr in first stitch (The 4ch counts as one treble crochet and one chain), miss next tr, 1dc in next tr (this is the centre tr of the shell), *(1tr, 1ch, 1tr, 1ch, 1tr) in the next dc - between the shells - miss next tr, 1dc in centre tr, repeat from * and end with (1tr, 1ch, 1tr) in the last dc and turn.

Note: I found when chaining 4 for the second row it helped to keep a stitch marker in the third chain, which acts as the first treble, then I know without confusion where to end the third row!


Stitch marker in third chain
Row 3: 1ch (this doesn't count as a stitch!), 1dc in first tr, *(1tr, 1ch, 1tr, 1ch, 1tr) in the next dc, miss the next tr, 1dc in next tr, repeat from * until end, once the last dc has been made, 4ch for the next row.

Repeat rows 2 and 3 continuing the pattern.

For my snood I used a whole 200g ball of chunky wool, but the work measured 125cm (49 in), which is plenty long enough for a snuggly snood for a woman. By repeating row 2 and 3 you can create the snood as small or as large as you wish.

Once the snood is to length, cut a large tail from the ball, and pass it through the last remaining loop to fasten the work. Use this long tail to sew the two ends of the snood together, or if you wish make the pattern long enough to make into a scarf, then you can keep the nice scalloped edge you have created.

Finished Snood
Sewing the ends together
From my experience making this snood, I do not think that using a variegated chunky yarn is really the best way of bringing out the shape of the pattern, this I think would be done much better by using a thinner plain yarn, like double knit, and perhaps even changing colours each row. But we live and we learn!

Sunday, 5 February 2017

Balling Scraps

In my square making frenzy for the Periodic Blanket, I started to make another multi coloured square and sadly discovered when the yarn ran out in my hand that I didn't have enough to finish the square.
I did however have enough yarn to make a neat little centre pull ball to use in another of my scrap projects! So I thought I would explain how I go about this without the expense of buying a little ball winder.
Toilet roll tube with small cut

All that is needed for making the ball is an old toilet roll tube - a kitchen roll tube or something of similar size should work just as well!

I then made a small cut in the end of the tube, this cut then holds the end of the yarn and this will be the centre. Once the end has been slotted in place the winding can start.

By holding the yarn a little way down, wind the yarn three times around the tube, then, turn the tube a quarter turn in your hand, and wind the yarn another three times. Repeat turning the tube a quarter turn and winding three times until the very end of the yarn.
First three windings

By the end there should be quite a mass of yarn on the tube. Once you have the outer end of the yarn tuck it under one of the previous windings to keep the ball from unravelling. The newly wound ball can then be slid off of the tube. Once off the tube it can be squished into shape.

Now there is a nicely wound ball of wool, which when used can be used from the middle without rolling away, and which looks neat and cute in your yarn stash!


Second three windings at a quarter turn of the tube

Fully wound and with the end tucked in

Fully wound ball off the tube and squished into shape


Friday, 3 February 2017

Square Pattern

This is the pattern I use for creating my squares.

At the bottom of this post is the pattern that I have written for the square. The paragraphs before explain how I have gone about following the pattern to create my square.

In this pattern I am using size 9 (3.75mm) needles and a double knit yarn. The particular yarn I'm using is a variegated, Hayfield yarn that I found in my local Hobbycraft, nothing too special!
The final square measures approximately 16cm x 16cm, but that can vary due to tension, needle size, and wool weight used.


To start with I have cast on two stitches and knitted them as a row.

The second row I am going to start to increase the stitches, and I am going to increase one per row, until I have 40 stitches.
In each row the first stitch is knitted normally, then the second stitch is used to increase. This makes the outer edge of the square less loopy and more neat.


Increasing First Step

Increasing
There is not a set way to increase each row in this pattern, but this is the way that I increase my squares, which looks neat.


The first step is to insert the needle into the next stitch, yarn over and pull it through (Shown in the picture) this is the beginning of a normal knit stitch. Instead of sliding the yarn off the left hand needle, slide the newly made loop onto the left needle along side the stitch you just made it from.

Now there is another stitch on the left hand needle. The newly made loop is treated as another stitch and the loop and its parent stitch are knitted along with the rest of the row.
Newly made loop next to the parent stitch


Once I have my 40 stitches (one per row), one half of the square has been done. To create the other side of the square each row is decreased by one, until there is only one stitch left.

Decreasing
To decrease on the second half of the square, the second and third stitch of each row are knitted together.

When decreasing, knit the first stitch of the row then knit the next two stitches of the row together to form one stitch.

To knit them together insert the needle from front to back through both of the stitches, yarn over the needle and pull it through both stitches like you would if doing a normal knit stitch.

Continue this until there is only one stitch left on the needle, pull this stitch into a loop. Cut the yarn from the ball and pass the end through the loop before pulling it tight to effectively cast off the square.
Decreasing: needle inserted through two stitches


Written Pattern:

Cast on 2,
Row 1: k to end of row
Row 2: *k1, inc1, k to end of row
Rep from * until you have 40 sts
Row 38: *k1, k2tog, k to end of row
Rep from * until you have one stitch
Cast off

A list of the abbreviations is included in another page on the blog. Pages can be found in the right hand bar.

Happy Knitting!

Completed square and half done sqaure