Tuesday 21 November 2017

A Heart to Mend Friendships

This was a little pattern that I found whilst scrolling through Pinterest. It was a crochet pattern, but one of the picture ones, and I thought I would give it a go with a little wool from the stash.

The pin that I read the pattern from can be found here, I also believe that the written pattern can be found on Ravelry (a link to that website is in the sidebar) but I'm not sure where on Ravelry.

I did really enjoy making this little heart. This one is now on it's way to a new home, but I might make a few more and find a cute project to put them into.

Sunday 12 November 2017

SOCKS!!!

I have finally made my first pair of socks, and I can say, I love them!

I also loved making them. I know that some people say they are confusing and complicated, and in some ways they are. But if you manage to get your head around what the pattern is asking you, it gets easier.

For this pair of socks I used a pattern from Love Knitting, as well as selling wool and needles, they do also sell patterns, and the pattern for these socks are free, and can be found here.

I used a similar wool and needles that it specifies in the pattern. That is five 2.5mm double pointed needles (DPNs) and some sock wool, which is 4 ply. The sock wool I used was a Regia yarn, which is very much known among sock knitters as some of the best. I found a nice variegated wool in my local wool shop!

The pattern in some places was really good, and I could understand the first part. There were a couple of places, where I feel that if I had not of read a couple of other sock patterns, I wouldn't really know what to do.

When knitting the heel flap, one stitch is knitted and the next one is slipped, as you go along the row. What it doesn't mention is that the stitch that is slipped should be slipped purlwise. The other thing that I found really quite confusing was when I had finished knitting the heel flap and was starting on the heel gusset (which is a bit that joins the heel to the rest of the sock so you can carry on knitting). When the pattern says " Pick up 1 st at top of gusset" it means, so pick up a loop from the gap between the two needles, and make another stitch. This means that there will be one more stitch on the needle. It is then used to help decrease stitches as you decrease the gusset.

Also at the end of the section "picking up stitches for the gusset" you should have 16 stitches on needle 1, 16 stitches on needle 2, and needles 3 and 4 need the heel stitches shared equally between them, with the middle of the heel being between the two needles. You can end up there by following the pattern, but it does get ever so slightly confusing.

Apart from the few confusing parts, the pattern is good, and gives quite a nice looking pair of socks. And like I said at the beginning I am in love with mine, and may have to make some more for some christmas presents, for other people, or maybe just for myself...


Sunday 5 November 2017

Buzz Buzz - My Sonic Spanner

My love for Doctor Who is known among
my close friends. So recently when looking for something to do with my BBC Microbit, I came across a Doctor Who Challenge on the BBC website. It was a great challenge aimed at young people, but great fun for the young at heart! 

One part of the challenge is to build a sonic device, and it can be ANYTHING! Which leaves a massive margin for creativity, but being the engineer I wanted mine to also be functional, and opted for the trusty adjustable spanner (I never use adjustables unless I really have to, so it was just laying around). 

I got designing, and using a bit of cardboard left over from some packaging I made somewhere to be able to attach the bits and pieces of the sonic spanner, to the actual spanner, which I did using bluetack (for every single bit). 

For the sonic spanner, you need a battery pack, (unless you want to be tethered to a computer - not a good idea!) a buzzer and a spanner. 

My buzzer is a piezo buzzer and I did have a right old time finding out that I couldn't control it digitally, and finding out that an analogue output was only as difficult as changing "write_digital" to "write_analog". I felt like an idiot for a bit...

One of the requirements for your sonic device (as well as buzzing) is to show a picture of the TARDIS on the LEDs on the Microbit. This took a little bit of designing, mine is a simple outline of a TARDIS, that I drew by lighting up individual LEDs and defining them as an image and naming it TARDIS. But I am sure if the mood took you, you could create any image you wanted. 

As there isn't really any guidance on how to get the sonic spanner working, it really is left to you as to what language to use and how you go about doing it. If you know about the Microbit, you will know that there is a few different languages you can use, some are harder than others and require a different way of thinking. I prefer to programme in Micropython. I've included a picture of my code at the end of this post, I hope it is useful to anyone who needs it.

The end product I made I got very very excited about. After having struggled to figure out what to do with my buzzer, (and finding out the answer was simple!) I felt quite proud of it. Now to go buzz at some cupboards..!


Sunday 29 October 2017

Birthday Scarf

Recently it was a good friend's birthday, and I had nothing on the needles and was feeling the itch to get knitting again.

So I made this chunky ripple-y rib scarf, it's a pattern that I have used for three other scarfs so far, and it is great!

The pattern itself is from the blog The Wool Nest and the very first scarf I made with it, I followed the pattern using similar yarn to the one used on the blog and created a very similar scarf for Mr M (one of the first things I knitted for him).

For this scarf I took a trip to the small wool and fabric shop on the high street and just went searching for some nice chunky wool. What I ended up with was the Hayfield Chunky Tweed, one in a light blue and another in dark blue. The tweed style of them gives little hints of colour here and there and I love it.

The scarf is a rib with a twist and it makes a lovely scarf that I would recommend for anyone. It has now been posted off to it's new home, where I hope it will have a happy and loved life!

Monday 9 October 2017

Fat Quarter Bunting

As a little project for when the best friend came to stay - she had just got a sewing machine and she wanted to come and use mine to build up her confidence (it worked!) - We decided to make some very simple bunting out of fat Quarters.

This weekend the bunting I had made finally went up!

I do apologize in advance for the poor pictures in this post, it is really difficult to take good looking photos in a small attic room with bad lighting!

For the bunting we used six fat quarters, around about the size of a fat quarter pack, although some do only come with five. There are twelve triangles on my set of bunting, and from the same fat quarters we made another set of bunting.

To make the triangles we cut out a triangle template. The template would have fit on an A5 piece of paper, but you can make the template either larger or smaller depending on what size of triangle you want. Just make sure that your two long sides are the same length and then join them up at the top.

For the bunting triangle we cut out two sides which are then sewn together. We drew around the template eight times on each fat quarter to make four bunting triangles (one triangle for each side). This was done on each fat quarter. We then shared the triangles between two sets of bunting with twelve triangles on each.

The two triangles are placed right side together and pinned in place. Using a seam allowance of half an inch, sew along the two long sides of the triangle before turning it the right way out.

It is worth trimming the excess fabric along the bottom of the triangle before it is turned the right way out, this allows a much cleaner and sharper point. It can also be useful to use a knitting needle or a pencil to push the final bit of the point out.

Once all of the triangles have been sewn and turned the right way out, they would benefit from being ironed, which allows them to lie flat and look pretty! :)

To attach all the triangles together we used bias binding, as it can be folded over and sewn down so the raw edges at the top of the triangles are inside and hidden. The bias binding that we used was 25 mm thick and 2.5 meters long. The binding was from Hobbycraft and they come on a little roll, and one roll is 2.5 meters long, so to make two sets, we did use two rolls!

I rolled out the complete length of the binding, and started to place where the triangles would go. I marked the centre of the binding and put a triangle at half an inch from the centre, and another at half an inch the other side. Working out from the centre I was then able to fit all of the triangles on with a gap of an inch between them all. I then pinned them in place and ran a line of stitching along one crease in the bias binding. After that row of stitching I trimmed the edges of the triangles that stick up into the binding, making sure that they had flat tops, so I was able to fold the other side of the binding over and run a line of top stitching along it all to finish it off.

And there we go, fairly simple way of creating bunting! I was really quite pleased with the outcome, and you could make the bunting a lot more special by using scraps of fabric, perhaps some personalised birthday bunting with old baby clothes? Or you could create plain bunting and put letters on them to spell out a greeting or a name? The possibilities are plenty, and with a little bit of creativity you can create something very special, and personal!


Monday 2 October 2017

Cozied Up

And just in time for winter it's finished!
I had started this scarf a while ago when I made one for Mr M, which you can have a look at here, along with the pattern.

I made this one with the yarn that I had leftover from making Mr M's football scarf, and thought I would make one for me, being a WRU supporter I took advantage of the colours being the same!

Now it is finished just in time to snuggle up for the winter, although we do look a little like tweedledee and tweedledum when we are both wearing them, but oh well...

In other news, my friend Slade has a blog called All About That Space, which, as the name suggests, is, all about Space! So if you want to catch up with the goings on in the sky, or just want to have a little read, go check it out.

Wednesday 6 September 2017

Nicky's Blanket

Everything has been go, but I have managed to get at least one project done this summer! This is Nicky's knee blanket, it may be slightly larger than a knee blanket, but it will certainly keep him warm.

This blanket I've had to keep quiet about when I was making it, as Nicky didn't want to see it before it was made. I've loved making it, and luckily Nicky loves it too.

The blanket was made from a pattern in a book for a baby blanket. It is a simple granny square blanket and was made by just adding more and more rounds. Instead of using the suggested three balls of yarn, I think I did actually use seven... My plan was to make it bigger then a baby blanket, but didn't really think it would be this big.

I used two balls of dark green, two balls of petrol blue and three balls of the pale green colour. I started the centre of the granny square with the pale green colour.

The colour is swapped every two rounds. The centre was the pale green, I then used the dark green, then another two rounds of the pale green, and then two rounds of the petrol blue. Doing it this way gave it a lovely striped pattern and the pale green made sure that the colours of the other two colours didn't drown each other out. But it does mean you use another balls worth of wool.

So in all I made a blanket big enough for a grown man, out of seven 100g balls of DK wool.

Safe to say I think he really likes it. (And yes I did give it to him in a pub.)

Monday 10 July 2017

Notebook Cover

It's been a long time since I last posted, and I really can only blame Module 11, it has taken so much work, time and effort, but I am pleased to say I actually passed it! :D

Anyway, I decided to make this little cover for a notebook or a book. I am always one for taking a book away with me, but it is always a little sad when you carefully put you book in your bag, only to take it out and it's managed to worm its way under everything, and bent the pages and now your water bottle has leaked all over it...
Admittedly this cover isn't waterproof but it can protect against most things!

The material I used I got in a fat quarter pack, and I used most of two of those fat quarters.

You need four pieces of material for the case, the width approximately 11 inches and 13 inches in length. I found folding a fat quarter in half along its long edge gave me the 11 inches before trimming the top down to 13 inches.

Two of these pieces will be the outside of the case and the other two will be the inside. Using a material in between the two materials can give the case more protection, but is entirely optional. I used some childs craft felt between my layers. It used two A4 size pieces, with a strip from another piece of felt to make up the width. If you are using felt, place the felt in the portrait position, with the fabric also in that position. There will be a gap between the felt and the top of the fabric, this is okay.

So we have four pieces of fabric and two pieces of padding. I started by laying two of the pieces of fabric right side together, then on top of that, laying one piece of padding. Making sure that the edges of all three pieces are lined up, I then made a seem with a straight stitch down one side, along the bottom and along the other long side, making sure to leave the top open. Then turn it the right way around. That is one side of the case.

I repeated that with the other three pieces of material, and I had two sides done. This is the point when I couldn't decide what fabric I wanted as my lining and what I wanted as the outside. Seeing as I had two halves with one side of each I decided to sew them together so each side was different.

I've got the two sides, and still the top is unsewn. I placed the two pieces right sides together (it doesn't really matter the way I did it, but if you want the inner and outer to be different then do!) and pinned them in place before sewing the two pieces together. Now this step can be done with a sewing machine, but my sides were very thick, and I didn't want to take much away from the space inside the case with seams. So I hand stitched around the outside. Admittedly this did take longer, but I think it was worth it.

Finally with the case mostly done, I just had to finish the top on both sides. I did this by folding the two rough edges inwards, and sewing a straight stitch along the top. Not forgetting to add a ribbon half way along one edge to be able to close the case.

There are a few different ways to secure the case shut, you could add buttons, button holes or loops to hold it shut, but I felt that a ribbon would be able to accommodate different sized books and notebooks that I wanted to put in there.

Also this case isn't just limited to books, it can be used for anything that would fit inside it that you wanted to cover!

I am sorry that I didn't take any step by step photos of how I did it. I can imagine that it could become difficult to follow. I am also aware that there might be an easier way to make this, so feel free to experiment and take away from this any ideas that you might have!!

Happy Making!


Sunday 21 May 2017

Legwarmers!!

They are here at last! The lovely leg warmers I promised.
They were made with double pointed needles and worked in the round, the two I've made are the inverse of each other and where I have started with one colour on one of the leg warmers, I started with the other colour on the other legwarmer. But this pattern is written for a lovely matching pair!

Each leg warmer is 15 inches long. My tension square was 3 3/4 (three and three quarter) inches by 3 3/4 inches, with 20 stitches and 17 rows, kitted in single rib, with DK wool and 3.75mm needles.

The pattern can always be adjusted to suit different sizes, by increasing or decreasing the number of stitches can adjust the size of the legwarmer, and by adding more or less rows can change the length.

The legwarmers themselves are kitted in single rib with DK yarn.
The pattern alternates different coloured yarns, but you can ignore the change of colour and knit a set of legwarmers in one colour, or use a variegated yarn.

Repeat the pattern twice to make two legwarmers.

Needles: 
A = 4 x 3.75mm double pointed needles.
B = 4 x 4mm double pointed needles.
Yarn A - this is the colour you start with.
Yarn B - the second colour you have chosen.

Pattern:
Cast on 60sts on 3 needles (20sts on each needle) with needles A and yarn A.

Place a stitch marker between the first and second stitches, this will indicate when to change colour later on.

Row 1: With the fourth needle and yarn A: (k1, p1) to end of round.

** To begin with you will have three needles in a line, to begin the first row, with the fourth needle, knit with the first needle in your left hand, make sure you pull this stitch tight, and then the three needles will have formed a circle. Having the stitch marker between the first stitch you knit and the second one will help when changing colour.

Row 2: (k1, p1) to the end of the round.

Row 3: k1, change to yarn B, (p1,k1) to the end of the round.

Row 4: (k1,p1) to end of round.

Repeat rows 3 and 4, changing the yarn colour every two rows. (The coloured stripes should be two rows thick, but the very first stripe will be thicker as you have cast on.)

Continue until the work measures 2 inches long, then change to needles B.

Continue with needles B until the work measures 13 inches and change back to needles A for another 2 inches.

Cast off.

Thursday 4 May 2017

Go Vote

Today I voted, did you?

The May local elections are small, but they are important.
When someone has fought for my right to vote, I feel like I should use it.
It's the same for everyone, today is the day for going out and deciding who is worth your vote. There are a huge number of people who don't think their vote will count. Collectively all those people will make a huge amount of difference. If we want a country that is run in a way that represents the people in it, EVERYONE needs to vote.

But today wasn't the big election. The big one is on the 8th on June, so make sure you get registered, get the info, and get down to that polling station and have your say.

No one else is going to do it for you.
Make sure you register by the 22nd of May to vote in the 8th June elections!
Register to vote


In other news, I've been playing around with my Bullet Journal and found a daily spread that I really like! There isn't much doodling and drawing like on some I've seen, (Which are pretty amazing).
This one is fairly simple, with a space for events happening in the day, tasks I need to complete, the weather and what I ate. There is also a large amount of space for notes during the day!

Apart from my journalling I have been working away on some of my makery projects, so hopefully soon there will be some stuff arriving!

Sunday 23 April 2017

Holidays...

I am very sorry for the lack of posting in the past three weeks. I had got romantic ideas that when I went to Wales for two weeks I would be able to finish loads of projects, revise for my upcoming exams, and manage to fit it all in around working on the Talyllyn Railway.

Obviously none of that actually happened. I worked on the railway most days, did minimal revision and hardly any making. But we'll try and get back on top of all of that.

I did start another scarf just like the one I did before (Striped Scarf). I made this one with the left over wool I had from the one the Mr M asked me to make. Whilst I'm not a football person, it did just happen to be the colours of the Welsh Rugby Union team! The pattern for which I've now put up on Ravelry so you can download it as a free PDF pattern here, but you can always refer back to the original post on the blog here for how to do the fiddly bits.

Sadly the lovely leg warmers that I promised are still a work in progress, but they will be up soon! I did take them to wales with me, but about two rounds were knitted of them... I know I need to get a move on.

The polka dot knickers also have not made any more progress, I didn't really feel up to taking my sewing machine with me.

In other news I have started bullet journaling.  There is a lot of cool things going on with bullet journaling and it has become really really popular over in the states, but going back and looking at the original website, it is actually a really useful tool when used properly, to help people organise themselves, but also be able to become more productive by writing down thoughts, and things that need to be done. Once those things have been written down the brain isn't struggling to remember everything that needs to be done, giving you a chance to properly focus on the task in hand.
There is a really interesting post about it here, it also mentions attention deficit traits, and gives a fair bit of food for thought.

There is also a section on that website for getting started. One of the lovely things about it, is that you can be as creative or as minimal as you like. You can use whatever you have around you to get started, you just need a notebook and a pen. I've just got a notebook I picked up from the doctor who experience in Cardiff, and a load of coloured pens. What you make of the journal is completely your own, and sometimes beautiful things can come out of it.

Wednesday 29 March 2017

Slow But Steady

Apparently wins the race...
This week (I know it's Wednesday but I've lost track of the week already!) I've managed little pieces here and there, but still, not much has rolled out of the factory doors!

I've made a little bit of progress on the Granny Stripe Blanket, it's now a whole three rows taller! (Hopefully more soon as I finish more bits and pieces off) To read more about that one check it out here.

There has been some work done on a lovely pair of legwarmers, which will be making their way here hopefully along with a pattern before too long, so that is to look forward to.

Apart from that, I've been panicking along with a whole ton of work from my Module 11 work, which is why there has been a sad lack of making recently, but hopefully when I get back on top of it all it will begin to pick up the pace again and we'll have lots of lovely made things to share! :)


Saturday 18 March 2017

Plodding Along

This week has been somewhat a slow week in the factory of things. I've been keeping up with our new module at Flybe, and making stuff has taken a little bit of a back seat, but we'll get around that, I just need to get a move on!

Today I made some more progress on the Polka Dot Knickers! I got the elastic sewn in to the two legs and the waist band, although this is only the first bit of elastic sewing, so they look rather crumpled and will begin to look better once I've managed to do all of the top stitching.

I did actually start to do the top stitching on one of the legs, and it is a very long and fiddly task. I got nearly all of the way around the leg and then the bobbin ran out and I decided that it was enough for today!

I have also started another blanket for a friend, but I'm not going to post that one until it has been finished and delivered, he doesn't want to see it until it's done.

Hopefully I'll get back on track soon! xx

Monday 13 March 2017

And Done.

On one quiet, hungover morning in Wales, I quietly knitted away and I finished the cover of the cushion that I have been making for a little while now. It was a happy moment to see the cover being finished.

The final steps are now for it to be sewn onto the cushion, and finally installed at the house in Wales.

The quite celebratory moment when this was finished was in the house that the cushion will be in, and at the time I was with the people who would be staying there too. It was pretty good. Another project finished and time to try and start another one!


Other posts about this project:
Making the cover: Mitred Knitting

Wednesday 8 March 2017

Polka Dot Knickers

One of my favourite Christmas presents this year was from Mr M's mum. Make your own polka dot knickers! Now I've made a skirt and done a little bit of quilting before, but never actually tried making knickers, or any kind of underwear to be honest. So this was one leap into the dark.
I've done my research when it comes to making clothes, it's been something that I've always had the urge to do, but never really got around to it finding all manner of excuses to not do it! But I have altered quite a number of things, luckily for this kit, you don't need too much experience, just a sewing machine.

In the kit is practically everything you need:
Fabric
Ribbon
Knicker Elastic
Thread
Hand Needles
In The Kit
Crochet Cherries
Pattern
Instructions
A Sticker for good measure (Mine went on my tool kit) 

What you also need but isn't in the kit is:
A sewing machine
Bobbin, you'll need to load the bobbin from the thread given in the kit.
Scissors, for both paper and fabric.
And as the instructions rightly point out, you're gonna need time and patience.

So to start off with the kit says to cut out the pattern from the paper. Me being me I didn't want to cut out the size of the pattern I needed, I wanted to keep the pattern for all sizes, so out came the tracing paper, and I traced over the small pattern that I needed. This did involve sticking two pieces of paper together - The A3 paper wasn't big enough!! 
Once I'd traced around the pattern it was then time to try and very carefully cut out the pieces from the paper, which was quite difficult, as I didn't draw my lines bold enough... Lesson for next time.

Now the pattern pieces are ready, I can then cut the pieces out of the fabric. Now there are a lot of different ways to cut the fabric. The suggested method is to pin the pieces to the fabric and cut around them. Being an engineer the amount of inaccuracy that can happen using this method makes me slightly nervous, so I tend to avoid this approach. The other well known way is to lay the fabric out, hold the pattern down with pattern weights and use a rotary cutter to cut out the parts. Now I don't have many snazzy things to make my stuff with, so I have come up with a way of doing it that is accurate and doesn't need many snazzy items. 

First of all, I iron my fabric so that it lays flat, creases and bumpy bits add to the inaccuracy of the size of the pattern! Then laying the fabric on a hard surface, I place the pattern on the top and draw around the pattern piece onto the back of the fabric. Drawing onto the fabric can be done with a tailor's chalk, but I just use a biro pen. Biro comes out in the wash and will draw easily on the fabric, win. win. 
When drawing around the pattern piece it can have a tendency to wiggle if you're not careful, this is where pattern weights can come in handy, not having any of my own I used a heavy gin bottle. Anything that is heavy enough can come in handy for this, even your half finished cup of tea! 

Once all the pieces have been cut out it is usually a good idea to iron out any creased bits if there are any.

Now, Let the sewing begin! 
The general steps is to match up the bottom pieces of all three parts and sew them together, the front and back pieces facing each other and the gusset. Then the sides get sewn together and you have what seems like a large pair of knickers! It's looking great already! 

The next part is the hardest so far. It's sewing in the elastic. The method of doing it is easy, it just takes some fiddly moments, and a lot of patience (and in my case swearing!). The idea is that you put pins in the elastic, so it is separated into four equal sections and the same is done for the leg hole (or waist)  and then the pins are matched up with each other and the elastic is pinned into place then, sew together. The first leg I was doing great with the sewing, until I found out that I'd pinned and sewn the elastic to the wrong side of the fabric... Great. So I unpicked the elastic and put the project down for the next time. 

So this is where this post ends, but I will finish these knickers off and post the rest of the making soon!

Sunday 5 March 2017

Carriage Brake Maintenance

This weekend the factory of things had taken a break from making, and went to Wales for some fixing!

This weekend I have been fitting new break blocks and adjusting the breaks and triple valves on the Talyllyn Railway, the world's first preserved railway. This is the railway that I do the most of my volunteering on, as is well worth a visit, to ride on or watch the little trains trundle their way up the valley!


Wednesday 1 March 2017

Mitred Knitting: Cushion Cover

Recently I was tasked with making a knitted cushion cover. I took this as a good way to try something new, so off I went to the library and trawled through a load of books on knitting (old fashioned I know, but I love the library!) and found out about mitred knitting, and I decided to make my own pattern for a cushion cover using different colour pieces of yarn to create a square pattern with a twist!

For those who are unfamiliar with the idea of mitred knitting, it's a way to knit several pieces of yarn together with little to no sewing the parts together.

What I found out was that there is a way to make about three different shapes, a big square, and L shape, a rectangle and a little square, all with the same base pattern.

The base pattern starts with the small square and the other shapes are done by repeating the pattern of the small square.

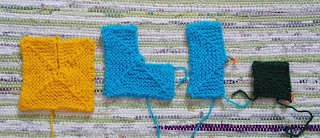
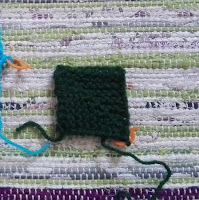
To start with one of the following shapes needs to be knitted on its own, I started with a small square as I found it easier but there are no rules as to what you can and can't knit! After one of the squares has been knitted, the next one is knitted, but when casting on loops are made through the edge of another square. This joins the two squares together, with no sewing.

The small square pattern is:

Cast on 19 sts

Row 1 and every odd row: k to last st, sl 1 pwise wyif. (The ending to this I've explained here in my scarf pattern.)
Row 2: k8, sl1, k2tog, psso, k7, sl1 pwise wyif (17)
Row 4: k7, sl1, k2tog, psso, k6, sl1 pwise wyif (15)
Row 6: k6, sl1, k2tog, psso, k5, sl1 pwise wyif (13)
Row 8: k5, sl1, k2tog, psso, k4, sl1 pwise wyif (11)
Row 10: k4, sl1, k2tog, psso, k3, sl1 pwise wyif (9)
Row 12: k3, sl1, k2tog, psso, k2, sl1 pwise wyif (7)
Row 14: k2, sl1, k2tog, psso, k1, sl1 pwise wyif (5)
Row 16: k1, sl1, k2tog, psso, sl1 pwise wyif (3)
Row 18: sl1, k2tog, psso, cut yarn and pull through last stitch to cast off.

To make any of the larger sizes the square pattern is repeated, so to make the rectangle the pattern will start:

Cast on 38.
Row 1: k38
Row 2: k8, sl1, k2tog, psso, k8, k8, sl1, k2tog, psso, k7, sl1 pwise wyif.

The 'L' shaped size has three repeats, and the large square four in the style mentioned above. I find it easier when working a square made up of more then one little square, to put stitch markers every 19 stitches, so I can easily see where to start and finish the repeat of the pattern.

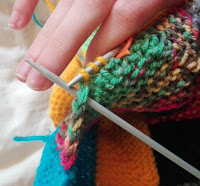
Now to actually join the the squares together the second has to be knitted onto the first, this is done when casting on, as loops are pulled through the edges of the first square. Lets say we wanted to add another small square to our first small square.
To start with cast on 9 stitches on your needle, the 10th stitch should be in the corner of the square. The next 9 stitches are pulled through the edge loops of the square, under the two pieces that make the neat straight edge:
Needle passed under edge loops

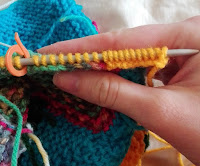
When I'm casting on stitches through the first square, I always pull them through from the front, which means that the messy bit is at the back. To do this I find it easier to swap the needles over in my hands, and sort of knit the loops as if they were another stitch!

Most of the cast on rows that I knit onto other squares have a mixture of stitches both through the side of the previous square and just cast on to the needle.
Both loops and cast on

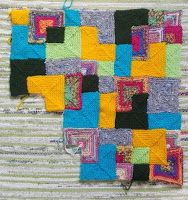
With this style of mitred knitting a huge variety of different shapes can be made, and some really nice effects achieved. The cushion case I am covering is 20 inches by 20 inches, so I had a large square to try and knit. With my tension and using double knit wool with size 9 needles, the small square measures 2 inches by 2 inches, so I drew out on square paper a large square, which was 20 squares by 20 squares on the paper, and I drew out within that square the shapes and sizes of the smaller squares made using this pattern to make the large cushion cover size!

If you are planning to make something to a specific size like a cushion cover then it would be best to knit one square with the wool and needles that you plan to use, then measure the square and you then will have an idea of how many squares and how large you need to make the final piece.

The beauty of this pattern is that when making something larger, you can plan it out and stick to the design you've planned, or just grab the needles and wool and knit whatever you decide is best next, and all variations are easy to do, and the spontaneous nature of the project can be really fun!

I haven't completely finished the cushion cover yet, but I am most of the way there, and with it laid out you can get a good idea of the finished product, I'm now excited to get it all done and put together.
The Nearly Finished Cover

Sunday 26 February 2017

Mini: Engine Building

Lined up after the Eurofighter kit was this lovely Mini Cooper Mk.1 kit. I do like classic cars and the Mini is one of my favourites. This kit is made by Revell and is 1:24 scale. 

The first step is assembling the engine, which is tiny and fiddly, but with thumb nails and a truck load of patience I got it sorted, and painted! 

As you can see from the photos the engine isn't properly completed yet, there is still a piece to sit right on the top, which is why the red stops and there is a rather unsightly lump of unpainted plastic on the very top of my engine.

For the paint I used enamel, black, gray and red. I used red gloss for the main engine block and grey and black for the other parts.

Front.

Back.

Wednesday 22 February 2017

A Little Bit of Bunting

Yet again I had another idea of what to do with my leftover project scraps, bunting! 
I find it cute and can be permanent or brought out for a special occasion. 


For my triangles, I used double knit yarn and a 4mm hook, although this really can be done with any sort of yarn and any hook!

Pattern:

Chain 2

Row 1: 2dc in second chain from hook, 1ch turn.
Row 2: 2dc in each dc, 1ch turn.
Row 3: 2dc in first dc, 1dc in every remaining dc, 1ch turn.

Repeat Row 3 as many times as needed. 

There is no set size to bunting triangles, they can be big, small, or all different sizes! I prefer all my triangles to be the same size, so when making them I've been comparing to other triangles that I've made so they all look the same size, even if the yarn is a different weight.

With all of your triangles made there are a couple of ways to put them all together in a string. The method I prefer is with ribbon. I have folded the ribbon in half and pinned it together and at intervals placed a triangle between the two sides of ribbon and then sewn the edges together, but I would suggest only doing that if you have a sewing machine, as a line of bunting can be quite long! 

The other option is to crochet a line to put them onto, this can be done by crocheting a string of a few rows and sewing the triangles on, or when chaining the string, chain into the top of the triangles, then work a couple of rows to give the string more strength.

Monday 20 February 2017

Shells and Chains Crochet Snood

Recently I decided to try out a new crochet stitch, and to use up some of my sneaky yarn stash, which is getting increasingly bigger!

Foundation chain with stitch markers
to help keep count
So I came across the shell and chains pattern and it is a crochet pattern with shells, but is not as tight, and a bit more hole-y then the normal shells pattern. I used a chunky and variegated yarn from my stash, as it looked the nicest to make a snood out of. Although from this experience I don't think that a variegated yarn is the best for this pattern!

I started off with a chunky yarn and a 6.5mm hook, but this pattern can be done with any yarn and the appropriately sized hook.

The foundation chain should have a multiple of 6 chains and then another two.
I have chained 50 (8 x 6, + 2), this gave me a snood which is 125cm long which I have sewn together at the ends to create the snoodness.

Row 1 Complete
Here is the pattern:


Chain 50

Row 1: 1 dc in 2nd ch from hook, *miss next 2 ch, 1dc, (1tr, 1ch, 1tr, 1ch, 1tr) in next ch, repeat from * to the end of the row then turn.

Row 2: 4ch, 1tr in first stitch (The 4ch counts as one treble crochet and one chain), miss next tr, 1dc in next tr (this is the centre tr of the shell), *(1tr, 1ch, 1tr, 1ch, 1tr) in the next dc - between the shells - miss next tr, 1dc in centre tr, repeat from * and end with (1tr, 1ch, 1tr) in the last dc and turn.

Note: I found when chaining 4 for the second row it helped to keep a stitch marker in the third chain, which acts as the first treble, then I know without confusion where to end the third row!


Stitch marker in third chain
Row 3: 1ch (this doesn't count as a stitch!), 1dc in first tr, *(1tr, 1ch, 1tr, 1ch, 1tr) in the next dc, miss the next tr, 1dc in next tr, repeat from * until end, once the last dc has been made, 4ch for the next row.

Repeat rows 2 and 3 continuing the pattern.

For my snood I used a whole 200g ball of chunky wool, but the work measured 125cm (49 in), which is plenty long enough for a snuggly snood for a woman. By repeating row 2 and 3 you can create the snood as small or as large as you wish.

Once the snood is to length, cut a large tail from the ball, and pass it through the last remaining loop to fasten the work. Use this long tail to sew the two ends of the snood together, or if you wish make the pattern long enough to make into a scarf, then you can keep the nice scalloped edge you have created.

Finished Snood
Sewing the ends together
From my experience making this snood, I do not think that using a variegated chunky yarn is really the best way of bringing out the shape of the pattern, this I think would be done much better by using a thinner plain yarn, like double knit, and perhaps even changing colours each row. But we live and we learn!

Friday 17 February 2017

Striped Scarf

Mr M in his scarf
A little while ago, Mr M asked me to make him a scarf for his football team. So I set about finding the right wool, and thinking about how to actually make the scarf.

I decided on using double knit wool, so the scarf wouldn't be too thick, and I used a single rib stitch. The end result was a nice scarf with the desired effect. Bellow is the pattern.

In the pattern there is an interesting finish to the edge of the scarf (sl 1 pwise wyif), this gives a smooth and neat edge to the scarf, I tend to use this when I need to create something in which the edges are most likely to be seen. The abbreviations here can be looked up in the abbreviations page in the side bar.

Here is what it actually means:
So the k1, p1 stitch is done until there is only one stitch left in the row, then like you would if you were doing a purl stitch, bring the yarn to the front of the needle. Then put the needle through the front of the stitch (like a purl) and slip the stitch from the right needle onto the left, and there you have finished the row! The stitch will be the first to be knitted on the next row, so it does not need to be worried about.
Yarn in front of needle
Needle through front of stitch
Finished row

Pattern:
Size 7 and size 9 needles (UK)
200g of DK wool
100g of colour A
100g of colour B

With size 7 needles cast on 50 sts with colour A

Row 1: (K1, P1) to last st, sl 1 pwise wyif.
Repeat row 1 for three more rows, change to size 9 needles.

Row 5: (K1, P1) to last st, sl 1 pwise wyif.
Repeat row 5 until you have 28 rows in colour A,

Switch to colour B and knit 24 rows of:
(K1, P1) to last st, sl 1 pwise wyif.

Repeat knitting stripes of 24 rows until you have 21 stripes

On the last stripe, when row 24 has been reached, switch to size 7 needles.
Knit four more rows of:
(K1, P1) to last st, sl 1 pwise wyif.

Cast off.

Tassels:
Tassels are optional in this pattern but I have included them on the scarf for Mr M, so this is how I've made them.

I started off with the two ends of the remaining yarn. In my tassels I've used both colours, but you can use only one colour if you wish, but you will have to wrap the yarn twice as much to get the same amount of tassels. I wrapped the yarn twice around my hand, cut it off the ball at the bottom, then along the same place as the ends, cut one side of the loops.

When wrapping the yarn you can wrap it around anything that has two straight edges if you don't wish to use your hand. By using something else you will be able to vary the size of tassel you make and if you are making multiple tassels then you will be able to ensure they are all the same size.

Now you should have four longish lengths of yarn, which are folded in half. With the top end of the tassel (the fold) pull it through a stitch (but not all the way) on the very edge of the scarf at the end. Once you have pulled the tassel part way through the stitch you will have a small loop on one side of the scarf and the tails on the other. Pull the tails through the loop and pull the tails so they tighten the loop around that bottom stitch. Now the tassel is attached.

On my scarf I have made 13 tassels and tried to equally space them along the bottom of the scarf, although if you made 25 tassels you would be able to place them at every other stitch along the bottom of the scarf. But the number of tassels and where you attach them is entirely down to your preference.