Wednesday, 29 April 2020

Finished Object - Hummingbird Handspun

Big wheels have been turning and Tina my spinning wheel has been busy, and I have finally spun my last braid of Pixel Atlantis fibre. This braid was a 100% BFL squishy loveliness in the Hummingbird colourway. I absolutely love the green colour it has come out with and it will hopefully be going with the other braid of Pixel Atlantis fibre I have already spun to make something exciting.

I decided to create this yarn in the simple way that I had created the previous braid, so that there was a more likely chance of them being mostly the same. So the braid was weighed, split in half and two singles spun.

The singles were then plied together in a simple two ply, I did have a little bit left over on one bobbin afterwards, which was a little sad, but I wound that off onto a bog roll tube and am saving it with another few from previous and hopefully when I have enough of them they will be plied up into something amazing - but more on that another time.

When I took this plied yarn off the bobbin I was pretty pleased with how balanced it was, and indeed there were a couple of people who were spammed on snapchat with it! But unfortunately I didn't save the photos.

The final yarn was about 16 WPI, so coming to a lighter sport weight (which is what the other braid is - winning!) and about 180 m. It is now all skeined up and with it's friend waiting for their new adventures.

Sunday, 26 April 2020

Finished Object - Dino Apron

As my baking has ramped up recently, and after one particular vegan chocolate cake escapade, I decided it was probably time to get myself an apron for when I'm in the kitchen. Thankfully I only got my work shirt covered in chocolate and not a me made! So time for a me-made that wants to get covered in chocolate.

I've been meaning to get on with making myself an apron, and wanted a full length one to cover my top half as well as my bottom half, so the pattern I used for the spinning skirt was out. I found a free tutorial on The Sewing Directory which you can find here. The tutorial walks you through drafting the pattern and then sewing the actual apron. I used the tutorial for drafting the pattern and loosely followed the instructions for sewing it together as I really wanted to go my own way. 

The pattern uses a small facing along the top of the apron to help insert the neck strap, and the rest is pretty simple too. I made my first apron following the instructions and I think it turned out okay.

I had two old tablecloths that used to be my mothers, which she gave me when I moved out, but which didn't fit my dining room table, so I thought they would be perfect for the job, as they were a fabric that I wasn't going to be too sad if it got covered in food and I had a couple of dinosaur fat quarters which I thought would make a brilliant contrast fabric.

Now I don't actually know what type of fabric the tablecloths were made out of, but I do know now that it is a little thick and almost impossible to get a nice crease out of when pressing. When cutting out I managed to lay out my main apron piece so that the bottom of the apron was along the already hemmed edge of the tablecloth saving me a little work.

The top strap and the pocket I cut out of the dinosaur fabric. Here I deviated a little bit from the pattern. I hadn't actually got enough fabric to create the whole upper strap in one piece, and I had been a little lazy and hadn't cut a pattern piece for it. I knew that I had a little buckle left over from when I made waistcoats for my Mam's wedding, so I thought that I would try and combine this in to the upper strap to make an adjustable one. So I created one short strap and one long strap, but which would both make up the length of the pattern strap, which were then inserted in the top of the apron as the pattern suggested.

The buckle was then sewn on the end of the short strap and the other end fed through to make the adjustable strap. The idea was all well and good, and the strap worked as an adjuster. But my fabric I think was a little too thin and the buckle didn't actually hold in place and would just slide off from around my neck when any pressure was put on it. I solved the problem by pinning the loose and of the strap to the other strap with a Simon's cat pin.

I can't say that straps were my strong point on this apron at all either. My main straps, whilst long enough to tie at the front - which is a must for me on my apron - were made of the same tablecloth and just feel a little to big a bulky for my liking. I think that is nothing to do with pattern but all to do with the fabric I was using.

I realise there is a lot of complaining about how this project wasn't perfect, but not all are. I will say that despite all of these things that aren't perfect with it, I do really enjoy wearing it in the kitchen and I do love the dinosaurs. The apron is perfectly functional, if not perfect in the way that I would have liked it to be.

With that in mind the cogs in my brain were turning and over the next couple of days I had thought up of ways that I would have done the apron differently to make it work, and I decided to have another go. I also had a good friend who wanted a dino apron too!

The next apron I made used the other tablecloth I had, so was made out of the same heavy fabric that was a little bit of a nightmare to work with. I decided that this time, only the main apron front was to be made with the tablecloth. I used a white dinosaur fabric for the neck strap and the front pocket, and used a thinner plain white cotton for the main straps (I had a good long length of this in my stash which was perfect for the job) I had also been toying with the idea of making the facing on the back a lot bigger to incorporate the side straps so they could also be sewn in easier.
Second apron with larger facing

This facing I decided to do with a scrap of light/medium weight cotton I had, to reduce the bulk in the top seam, and I think it worked really well in the end. The second apron I am a lot happier with then the first. The bigger facing allows the straps to be easily installed, and the added understitching along the facing added another strengthening seam as well as encouraged the facing to turn under. That apron will be sent off soon and I really hope it is enjoyed where it is going.


Wednesday, 22 April 2020

WIP Wednesday - Periodic Table Blanket

I feel it is high time that I gave you all an update on this massive project of mine, which has been going on for what feels like forever (I believe it is about ten years...) I seem to go through waves of really getting into the project, and knitting several squares for it, and then not touching it for another several months.

Recently I reached a new milestone for it! I finally completed groups 3 through 12, the biggest number of same coloured squares. For some reason, in past Lottie's infinite wisdom, I used the most eye wateringly offensive shade of neon orange. I really don't know why, I must have been going through something! XD Anyway, with those squares now out of the way I can turn my attention to the remaining groups on the table. Groups 13 through 16 including helium will be in the same colour. But I don't have a colour picked out for them just yet. I am thinking of looking through my stash and seeing what I already have. I know full well that I won't have enough for all the squares I need, but at least I can get that one ball out of my stash before I get a load more to complete that section of the project.

Now with groups 13 through 16 considered and planned out, the only squares left are the Actinides, these I do actually have the yarn for, and are a delightful hot pink - Again. past Lottie, what were you thinking? - Unfortunately that yarn is sitting at my mother's house, and as I write this we are in the middle of a lockdown amidst a global pandemic. There is no chance I'm getting that yarn any time soon.

That all being said the end for this huge project does seem to be in sight. I think if I kept my mind to it then I could start to work my way through the next set of groups, and hopefully it won't be another ten years to finish this project!

To take the photo for this post, I laid all the squares out on my living room floor, and they took up more space than I actually had. There was also a lot of tension changes, which will be fun to deal with when we come to  trying to join all the squares together.

Sunday, 19 April 2020

Finished Object - My Secret Crop

This project was very much started on a whim, but actually perked up my knitting mojo, and I ran with it. It was the first project in a few weeks that I actually really enjoyed knitting on. I follow Jessie Maed Designs on instagram, and she was having a mystery knit along (MKAL) for a new crop top design. She had thought the design up, and hadn't had anyone test it, so was offering it free and making adjustments to the pattern as the MKAL went along with the problems that people were finding. It looked really fun, so after the first couple of days I joined in too.

The project was perfect for that one skein of Malabrigo Rios that I had in my stash that I really didn't know what to do with. I used up pretty much the whole skein and didn't have much left over at all. I knit the small size. As was the nature of the MKAL I didn't know what the final outcome would look like, but I went with it and I am really happy with the finished object.

I will admit the weather isn't really the best here in England at the moment, it may be sunny but I'm not too sure if it really is warm enough to be wearing this lovely crop top outdoors just yet. Anyway, here she is in all her glory. The My Secret Crop, in Malabrigo Rios in the Sunset colourway. A lovely warm crop, which was amazingly quick to knit up.

Wednesday, 15 April 2020

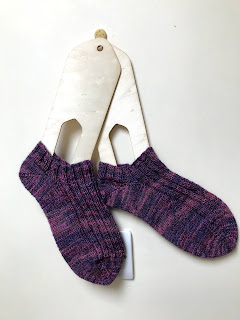
Finished Object - Leftovers Shorty Pair

After finishing my last shorty sock I needed another sock to knit on whilst on break at work, and I looked at the bits of sock yarn I had left, and one cake was about 50g of Gamer Crafting Yak Sock that I had leftover from when I knitted the lovely Lyne Socks by Dawn Henderson. I thought that 50g was enough to make a shorty pair and not just one mismatched sock. So that is what I decided to do.

I fancied playing around with my shorty socks and not just doing another plain vanilla sock. Which this yarn lent itself to more then the previous self striping/patterning yarn that makes it difficult for a textured pattern to show up. I decided to do something simple and just carry on the 2x2 rib from the cuff of the sock down the top of the foot, and I am actually quite pleased with the outcome.

So I cast on 60 stitches, with my 2.5mm DPNs and knit one inch of 2x2 ribbing for a cuff. I then knit one plain round (bearing in mind the front was still knit in 2x2 rib and the back plain stocking stitch) before starting the german short row heel. This has become my go to heel, but only because it is easy to do and I can do it off the top of my head. But I did wear one pair of my knitted socks that had a heel flap and gusset, and I remembered how well they fitted, so I might have to try that one again next.

After the heel the rest of the sock was knit, plain stocking stitch on the bottom and 2x2 rib on the top, until we got to the toe. It was a simple toe, with an extra two rounds on the end to give a tiny bit of extra room. These socks took a little while longer to knit then the previous two shorty socks, but I did knit two instead of one! These were only knit on whilst I was at work in my break times, so the going was going to be slightly slower.

Overall I'm pretty happy, and have another lovely pair of socks to add to my collection. Now onto the next leftovers.

Monday, 13 April 2020

Grow - March Round Up

Fist Basil Set
As the month rolls into April there is another set of jobs to get done in the garden, and with the sun coming out and it feeling incredibly like spring has sprung I could not wait to get back out there. With the recent Covid-19 outbreak and the lockdown measures in place, a lot of people have been turning to their gardens as a source of comfort and something to do. I am no exception there, I feel that having something to care for and something to think about really does take my mind off what has been happening in this world around us.

It is important to note here that going out to buy gardening things is not classed as an essential trip, people should not be encouraged to go and make those extra journeys, putting themselves and others at risk. That said a few of the things I have done this past month I've done using what I had to hand, and no trips have been made to get supplies. I also know that some supermarkets are selling things like plants and bags of compost, so you can kill two birds with one stone if you really want to get your hands dirty and pick those up on your weekly essentials shop.

Last time I shared the garden with you all I had just planted the first sets of basil, spring onions and spinach. Those three sets are growing well, and three weeks after the first lot, I've planted a second sowing of all three. The Spinach moved from the sunny spot by the back door, to the windowsill in the kitchen where it has been quite happy, and hopefully soon will be ready to provide leaves.

Kitchen Windowsill Spinach
Thinned Out Spring Onions


The spring onions have shot up, and finally been thinned out. I only really thought later on that I remembered reading something about them needing their own space. They had grown like anything incredibly quickly and then stalled. So I got around to thinning them out to about an inch apart. I was a little torn as to what to do with the little seedlings, do I try and replant them in their own space? I was also curious as to what they were like at this early stage, so I tried one. It was actually quite onion-y so I decided to wash this little handful and had them chopped up on top of my salmon that night for tea. I was actually really quite pleased that I had managed to eat something that I had grown for the first time ever!

The basil was a slow grower, it took forever for it to pop out of the top of its pot, and I will admit it did almost lose heart in it, but a little more patience saw it through. The little plant is growing well, and when it is big enough it will probably move into the kitchen to be with its spinach friend on the windowsill. 

In my offshift three weeks after I had first planted the seeds, I set about planting another set of each. This did also happen to be early April and I tackled my garden jobs list as well. I planted another two sets of spring onions. The first set was going into the garden, and is the first thing that I have actually planted outside, and I am pretty excited. I did however plant another set indoors just in case. I marked the area where I had planted them with some twine and a few sticks I found in the garden, for an easy reference for when I come to water them and to just check on them.

I also started off my carrots, these I decided to plant in a pot on the patio. This will hopefully mean that they won't come across some of the other problems they could in the ground. I'm a little worried about my carrots though, I know that April is a little early for them and not having any access to things like fleece to keep them covered is something to think about. I suppose with them being in a pot, if things get really bad outside I can just bring them inside.

I did have to wait another week for my leek seeds to arrive, which I was too late in getting at the garden centre, so had to order online. With the lockdown at the moment a lot of online businesses are working harder then ever so are taking longer to ship orders. I ordered my leeks from Suttons Seeds online and they took just over a week to get to me, which was good. They got planted in a little pot and are now sat by the back door with the other veggies, and hopefully will start to grow. They are being started "on the windowsill" for now and I think I will plan to plant them out in June time.


The second sets of spinach and basil pulled the short straw really, and I didn't have many spare pots for them, so I improvised. The spinach got planted in the bottom half of a milk bottle, and the basil in a marmite jar. I'm being a little mindful about how much I water these two, as the makeshift pots they are in do not have any drainage holes in the bottom, so have a larger chance of becoming waterlogged. But despite that, both the pots have started to germinate and I've got little bits of green poking out of the tops of both of them.

One thing that wasn't on my garden plan, was a little experiment I decided to try out. I was cutting up a red bell pepper when I was making my tea one night, and on a whim decided to save the seeds. I wanted to see if I could grow them. Reading up on how to grow pepper seeds, it mentioned the need to keep them in a propagator at a temperature of around 21 degrees (I'm paraphrasing here, don't take my advice! :P ). With us being in a lockdown, I cannot go out an purchase a snazzy propagator, and the seeds needed planting out pretty soonish. So I got my thinking head on and made a propagator out of an old milk bottle (2 pint), a scrap of cotton fabric and a sandwich bag.

I cut the milk bottle in half and cut most of the handle off, leaving a little bit of it. I then put some water in the bottom half of the bottle, up to the little line. Then cut a slot in the lid of the bottle. I threaded one end of my fabric scrap through the lid a little way. This fabric scrap is going to act like a moisture wick. I then screwed the lid back on the milk bottle and put the top half upside down in the bottom half, with the little bit of handle sticking out over the top to stop it from sliding all the way down to the bottom. The fabric should sit in the water at the bottom and come up through the lid into the top half.

I filled the top half with compost and sowed my pepper seeds. I watered it then, and put the sandwich bag over the top, tied it in place with a piece of yarn I had lying around and placed it on my spare room windowsill.

There was a lot of condensation on the inside of that bag as the weeks went on, but without having to touch it at all. two and a half weeks later I'm looking at a couple of green leaves sticking out the top looking happy. So now that gamble has taken off I need to read up on what to do next! I'm thinking I will keep these plants in a pot other than planting them outside, as they seem to need a fair amount of greenhouse time and hardening off before they can really brave the british weather. We will see what the next few weeks will bring I suppose.

If you really are curious as to how my seed propagator went together, then have a look at the pictures I've posted here, and maybe they'll explain a little bit better than I have with words.

The last unexpected garden happening, happened the most recently, when I decided that the three aloe plants that I had upstairs on the bedroom window had failed. They were three of five babies I had taken out of the mother plants pot. Whilst the other two had thrived these had turned brown, and I didn't know what I had done to them. They didn't seem to respond at all to me giving them more or less light or even varying amounts of water. I thought they had properly died, so I went outside to take them out of their pots and put them in the compost heap, but taking them out of their pots I realised that two of them had developed quite a large route system, and it seemed a shame to not try and give them a second chance. So that's what I did.

I planted the three of them out in the flower/veggie bed in the garden. They went in a section of the bed that I didn't really know what I was going to do with. We will see what comes of them now, as they aren't so reliant on me to feed them right!

That is all I have to say for this monthly round up of the garden. I really hope you are enjoying the blog, as well as the weekly updates from me are happening on both a Wednesday and a Sunday now. My plan is to release these Grow posts just as and when I get around to writing them so I don't have to try and squeeze them in and around all the other making.

So, happy making, happy gardening, and keep safe. I will see you all again really soon!
L xx


Sunday, 12 April 2020

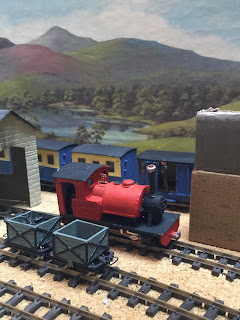
WIP Sunday(?) - Railway Working Weekend

We have had a lot of finished objects over the past couple of weeks, so let us mix it up with a WIP. This is not your normal work in progress, but is a little update on the model railway Llyn Fach. As many railway modellers know, a railway is never finished, so don't expect this to become a FO any time soon! ;)

For quite a while, not much work at all has happened on the Llyn Fach, and that is largely due to life getting in the way. The Llyn Fach is a small model railway that my Dad and I are building and have been for as long as I can possibly remember. Recently my Dad came to visit for the weekend and we had a great time planning some things out and getting on with building some scenery for our beloved little railway.

I trawled back through some of my old photos and managed to find some from when I last did any work on the railway. To give you an idea of where we started at the beginning of the weekend. The layout is very bare and there isn't a clear idea of what we want to happen. But we do have a mostly working track. There might be a few dodgy track joints that need to be sorted before ballasting happens, but we'll cross that bridge when we come to it.


So when we started on this working party weekend, we had a bridge, a cardboard cut out of a platform and a plastic engine shed that was just placed around as something to look at. Our first port of call was to draw up some ideas as to what buildings we wanted and where. We decided to concentrate our efforts on the left hand corner with the bridge and the main station. This is where we started thinking of our station building and engine shed, and I got a crash course in scratch building buildings from cardboard.

Dad used his delightful drawing skills to create some lovely sketches of what our plan was and we set to work. We had a plan to make a lift out section along the top of the corner tunnel, as I had to cut that bit out to relay some of the track. So we came up with a removable grassy section. I had some foam left over from my old work tool box that made an excellent base for that, along with a retaining wall and a paved road and car park made from a leftover piece of wet and dry! - Terrible for tyre wear. ;)

That corner was most of the first days work, as well as a little tool/brake van for our wagon rolling stock, which would have received a lick of paint if we had the colours that the wagons were originally painted in. That was the result of our confusion as to where the paint had even ended up in the first place.

The second day, a start was made on buildings. We had a lovely morning of drinking tea and building things in our pyjamas. The station building started to come into existence, and I made a water column - my first ever scratch build! - It still needs finishing off, with some pipes and some water, but I need to have a good think about how to do that one.

Road with removable section.

The new brake van.

Station building in progress.

Arty action shot, water column visible.

 Overall I think we both had a lovely weekend, it was nice and relaxing, and we got a lot of things done. Railway modelling is something we have both done together for a very long time. All photos of the railway after our weekend are courtesy of Dad and hopefully there will be another update before too long.

Wednesday, 8 April 2020

Finished Object - Cleo

My first off shift of the country wide lockdown started off quite productive, and I managed to get another long standing queue sewing project done. Quite a while ago I treated myself to a kit from Tilly and the Buttons to make the Cleo dress. Now I'm not normally the one for dresses, I only own one or two, but I fell in love with this one, and even more so now I have finally made it.

I did have one or two worries to start with, I had gone with the denim fabric kit, and I have never before worked with denim, but I did have a listen to the Love To Sew podcast episode on Denim and it made me feel a lot less nervous, and finding some denim needles in my sewing box I thought I would just dive straight in, and I am so glad I did.

I spread the making over a few days, but it could have easily been smashed out in a day. I started off tracing out the pattern on one sunny day and the next day was cutting out the pieces, again with the glorious sunshine on my back.

The pattern, with its lovely booklet, talks you through how to make the dress with clarity and lovely clear photos. Perfect for the ambitious beginner or a nervous sewist. The kit I got came with everything I needed, including the buckles and buttons, which was so useful, but I'm sure they are pretty easy to come across on the internet.

Taking the pattern slowly and one step at a time it really got my sewing mojo back on course and I loved how it turned out. I was worried at one or two points along the way that I wouldn't like the end product. I've said before how I'm not much of a dress person, but I think having made this and finding ways to style it that I feel comfortable in, I'm really quite happy.

I was also quite excited to learn how to finish off the seams in that typical jeans style, and got a lot better at my top stitching when making the pockets. Yes you read that, pockets! And so many! If you are anything like me, pockets on anything are a must and incredibly exciting. I took the options of a big front pocket and two smaller back pockets, but there are also instructions for front hip pockets too. I'm sure that if you were adventurous enough you could add in seam hip pockets, which might be my challenge for another day.

Having now got sewing with denim tucked firmly under my belt, I am looking at trying a full set of dungarees as well as a pair of jeans. I'm already excited for these, but first I've got a few other things to get sewn, whilst rocking this new dress of mine!

Sunday, 5 April 2020

Finished Object - 3-ply Mini

My spinning wheel was one of the most precious things that I moved when I moved house, it came in the car with me and was one of the first things to be moved into the house even before my furniture came the day after. But I haven't done a huge amount of spinning since, horrendous I know! As part of my Virtual Knit Night we did a secret santa swap, and my lovely secret santa partner gave me a wonderful purple, navy and black braid of fibre. Half I spun like I would normally into a traditional two ply, my go to. But the second half I wanted to try something new.

I had heard other people talk about traditional 3-ply when they were spinning and I felt like I wanted to give this a go, and I decided to do it without any kind of research and it would be an experiment just to play around and see what happened. I found it so nice to do, and I might even consider doing it again!

So I weighed out and split the braid into three equal parts and spun the singles. These I made a special effort to keep as thin as possible. It was the first time that I actually spun with an outcome in mind. I wanted the final yarn to be as thin as I could make it, as I knew that having three plys would make it naturally thicker. It went relatively smoothly, we only had one or two snapped threads, and there wasn't too much swearing! ;)

Then came the plying. I kept it really simple with the traditional method, the only problem to overcome was the lazy kate. My tip top super duper snazzy lazy kate... It's a shoe box with knitting needles pushed through the sides to hold the bobbins. Until now it has only had two needles, as I haven't plied anything more then that. Fortunately there was enough space to poke through another knitting needle (as I really am not short of those) and we were all set up and ready to go.

The plying went super smoothly and was even a little more pain free then my normal 2-plying methods, so I was pretty happy. The final yarn had a little bit of a twist to it when it came off the bobbin, but not as much as some of my chain plied yarn. I was really quite pleased, and hopefully it will be quite a strong yarn. I do need to find something to do with it though!

The final measurements of the mini were:
For 24g, 17 WPI (light sport weight), with a yardage of 84.9m.
All in all I'm pretty pleased with it, its soft, squishy and the colours are pretty too. I was also quite pleased that I managed to get a sport weight out of a three ply, as my normal two ply efforts are a sport weight too, which does lead me to believe that the thinner singles really did work their magic. Now to work through the other delightful braids that I got for christmas too!

Wednesday, 1 April 2020

Finished Object - Spinning Apron

I feel that calling this a spinning apron makes me seem like a saxon maid who is sat outside her mud hut watching the chickens and spinning away. That may be completely historically inaccurate, and I apologise, but calling this anything other than a spinning apron would just be lying.

For some time now I have had a small amount of fabric sat in a box waiting to be sewn into this apron. I didn't know what sort of apron or what style of apron it was going to be. I just knew I wanted something to keep the fibre from sticking to my jeans when I was spinning.

In the past few weeks I've been missing my sewing, and it was only when I finally bought myself an iron that I felt able to get back to it. I find an iron so so helpful it was a little odd to even try anything without it. While scrolling through youtube videos, I found one of Juliet Uzor's videos on how to make a circle skirt apron and I thought that would do. I'm not sure how I feel about it at the moment, I'm not really one for skirts, never been able to feel comfortable in them, but if I didn't get this sewn I don't think it would have got made at all. So I went for it.

Juliet has a free pattern for the apron on her website Sew So Natural, you can gain access to her resource library if you sign up to her newsletter. The library gives a printable PDF pattern. My only problem was that I don't have a printer, and I wanted to make the pattern there and then. So I got my maths head on. I know that I wanted half of a circle skirt, which as the name suggests is just a circle. Good old Pi came out to play. Let me run you through a quick drafting method for making your own.

First of all you want to take the measurement of your waist, or where ever the waistband of the skirt is going to sit, that could be around your hips if you want to. This measurement will become the circumference of inner circle on your pattern.

We now need to find the diameter of that circle, we will call the diameter "a" (as on the diagram). To find "a" we use the equation: diameter = circumference ÷ Pi. If my waist measurement was 74cm then I would calculate: 74 ÷ 𝝿 = 23.55 (Nerd alert, I do everything to two decimal places/three significant figures, you don't have to, round up to the nearest whole number to make it easy!) I used a scientific calculator because I have one, but if you don't then you can use the approximate figure of 3.14, you don't have to be super accurate.

So brilliant, we have measurement "a" now measurement "b" will be the length of the apron. This one is down to personal preference, I held a tape measure at the point I wanted the apron to sit and then measured down the length I wanted it to be. You will want to consider the amount of fabric you have and how the pattern will fit on to that fabric too. I decided that my length was going to be 45cm, which was really as long as I could possibly get out of the fabric and don't forget to add a little bit for hemming at the top and bottom.

The piece of fabric you will cut will be half of the circle. Just like the top part of the circle above the green line on the diagram. I got out the fabric and folded it in half to trace out the measurements for the pattern. Starting at the corner on the fold, I measured down the radius of inner circle along the edge with the fold. The radius being half of value "a" that we worked out earlier, then on the other side coming from that same corner I marked out the radius again. Then from that corner I marked the same distance out in an arc around that corner. This then marks the inner circle on the fabric.

From that first arc you can then measure down the length you want the apron to be including seam allowances for the top and bottom hems. Mark out this distance at regular intervals along this arc to make another much bigger arc further down your fabric, and you'll see the general shape of the apron start to take place.

Now I didn't really have enough fabric for this project, and I am actually making it out of an old blind that I found in a charity shop. So I decided to do a little bit of historical piecing and cut another couple of small pieces to stitch onto the sides to make the full skirt, else it would either been very short, or a really odd shape. I think it worked well overall though, and it being only something to keep the fibre off my legs while spinning, it really did not have to be the most perfect thing. I'm loving all of its imperfections and perfect functionality.

The waist ties that keep the apron on are the next thing to tackle. I'm pretty sure I bodged these and I'm not entirely sure how to explain how I did them, but I'll give it a go. The most easy thing to do here is to just hem all the edges of the apron and sew some ribbons to the edges next to the waist line and go from there. (I'll definitely do that next time) But I tried to make some ties with the fabric I had leftover from making the skirt.

 I used as much length as I could, which wasn't quite long enough, and cut them into about 4" wide strips. I turned the strips right sides together and sewed along one of the short sides. The other short side I placed right sides together over the waist of the apron, with the short side lined up with the edge of the apron. Each side of the strip was either side of the apron fabric. I then sewed along that short edge attaching the strap to the apron. That was the most complicated bit, and there probably is a much better way of doing it that maybe one day I'll discover. So after all that strap wrestling, I pulled the strap right side out and gave it a press, turning under the bottom raw edge and going along it with a bit of top stitching to hold it all inside. Then simply repeat with the other side... :P

Next time I really am just going to use twill tape or something similar as the straps, as these were so much effort and to be perfectly honest are not really that great. The apron has been put to good use though and I am happy that I've finally got around to making it. More spinning and less cleaning of my clothes from now on! ;)