Sunday, 26 February 2017

Mini: Engine Building

Lined up after the Eurofighter kit was this lovely Mini Cooper Mk.1 kit. I do like classic cars and the Mini is one of my favourites. This kit is made by Revell and is 1:24 scale. 

The first step is assembling the engine, which is tiny and fiddly, but with thumb nails and a truck load of patience I got it sorted, and painted! 

As you can see from the photos the engine isn't properly completed yet, there is still a piece to sit right on the top, which is why the red stops and there is a rather unsightly lump of unpainted plastic on the very top of my engine.

For the paint I used enamel, black, gray and red. I used red gloss for the main engine block and grey and black for the other parts.

Front.

Back.

Wednesday, 22 February 2017

A Little Bit of Bunting

Yet again I had another idea of what to do with my leftover project scraps, bunting! 
I find it cute and can be permanent or brought out for a special occasion. 


For my triangles, I used double knit yarn and a 4mm hook, although this really can be done with any sort of yarn and any hook!

Pattern:

Chain 2

Row 1: 2dc in second chain from hook, 1ch turn.
Row 2: 2dc in each dc, 1ch turn.
Row 3: 2dc in first dc, 1dc in every remaining dc, 1ch turn.

Repeat Row 3 as many times as needed. 

There is no set size to bunting triangles, they can be big, small, or all different sizes! I prefer all my triangles to be the same size, so when making them I've been comparing to other triangles that I've made so they all look the same size, even if the yarn is a different weight.

With all of your triangles made there are a couple of ways to put them all together in a string. The method I prefer is with ribbon. I have folded the ribbon in half and pinned it together and at intervals placed a triangle between the two sides of ribbon and then sewn the edges together, but I would suggest only doing that if you have a sewing machine, as a line of bunting can be quite long! 

The other option is to crochet a line to put them onto, this can be done by crocheting a string of a few rows and sewing the triangles on, or when chaining the string, chain into the top of the triangles, then work a couple of rows to give the string more strength.

Monday, 20 February 2017

Shells and Chains Crochet Snood

Recently I decided to try out a new crochet stitch, and to use up some of my sneaky yarn stash, which is getting increasingly bigger!
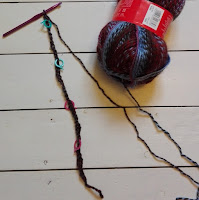
Foundation chain with stitch markers
to help keep count
So I came across the shell and chains pattern and it is a crochet pattern with shells, but is not as tight, and a bit more hole-y then the normal shells pattern. I used a chunky and variegated yarn from my stash, as it looked the nicest to make a snood out of. Although from this experience I don't think that a variegated yarn is the best for this pattern!

I started off with a chunky yarn and a 6.5mm hook, but this pattern can be done with any yarn and the appropriately sized hook.

The foundation chain should have a multiple of 6 chains and then another two.
I have chained 50 (8 x 6, + 2), this gave me a snood which is 125cm long which I have sewn together at the ends to create the snoodness.

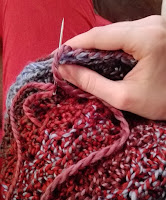
Row 1 Complete
Here is the pattern:


Chain 50

Row 1: 1 dc in 2nd ch from hook, *miss next 2 ch, 1dc, (1tr, 1ch, 1tr, 1ch, 1tr) in next ch, repeat from * to the end of the row then turn.

Row 2: 4ch, 1tr in first stitch (The 4ch counts as one treble crochet and one chain), miss next tr, 1dc in next tr (this is the centre tr of the shell), *(1tr, 1ch, 1tr, 1ch, 1tr) in the next dc - between the shells - miss next tr, 1dc in centre tr, repeat from * and end with (1tr, 1ch, 1tr) in the last dc and turn.

Note: I found when chaining 4 for the second row it helped to keep a stitch marker in the third chain, which acts as the first treble, then I know without confusion where to end the third row!
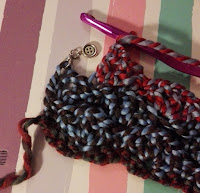

Stitch marker in third chain
Row 3: 1ch (this doesn't count as a stitch!), 1dc in first tr, *(1tr, 1ch, 1tr, 1ch, 1tr) in the next dc, miss the next tr, 1dc in next tr, repeat from * until end, once the last dc has been made, 4ch for the next row.

Repeat rows 2 and 3 continuing the pattern.

For my snood I used a whole 200g ball of chunky wool, but the work measured 125cm (49 in), which is plenty long enough for a snuggly snood for a woman. By repeating row 2 and 3 you can create the snood as small or as large as you wish.

Once the snood is to length, cut a large tail from the ball, and pass it through the last remaining loop to fasten the work. Use this long tail to sew the two ends of the snood together, or if you wish make the pattern long enough to make into a scarf, then you can keep the nice scalloped edge you have created.
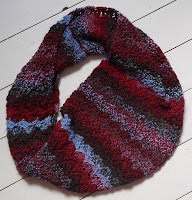
Finished Snood
Sewing the ends together
From my experience making this snood, I do not think that using a variegated chunky yarn is really the best way of bringing out the shape of the pattern, this I think would be done much better by using a thinner plain yarn, like double knit, and perhaps even changing colours each row. But we live and we learn!

Friday, 17 February 2017

Striped Scarf

Mr M in his scarf
A little while ago, Mr M asked me to make him a scarf for his football team. So I set about finding the right wool, and thinking about how to actually make the scarf.

I decided on using double knit wool, so the scarf wouldn't be too thick, and I used a single rib stitch. The end result was a nice scarf with the desired effect. Bellow is the pattern.

In the pattern there is an interesting finish to the edge of the scarf (sl 1 pwise wyif), this gives a smooth and neat edge to the scarf, I tend to use this when I need to create something in which the edges are most likely to be seen. The abbreviations here can be looked up in the abbreviations page in the side bar.

Here is what it actually means:
So the k1, p1 stitch is done until there is only one stitch left in the row, then like you would if you were doing a purl stitch, bring the yarn to the front of the needle. Then put the needle through the front of the stitch (like a purl) and slip the stitch from the right needle onto the left, and there you have finished the row! The stitch will be the first to be knitted on the next row, so it does not need to be worried about.
Yarn in front of needle
Needle through front of stitch
Finished row

Pattern:
Size 7 and size 9 needles (UK)
200g of DK wool
100g of colour A
100g of colour B

With size 7 needles cast on 50 sts with colour A

Row 1: (K1, P1) to last st, sl 1 pwise wyif.
Repeat row 1 for three more rows, change to size 9 needles.

Row 5: (K1, P1) to last st, sl 1 pwise wyif.
Repeat row 5 until you have 28 rows in colour A,

Switch to colour B and knit 24 rows of:
(K1, P1) to last st, sl 1 pwise wyif.

Repeat knitting stripes of 24 rows until you have 21 stripes

On the last stripe, when row 24 has been reached, switch to size 7 needles.
Knit four more rows of:
(K1, P1) to last st, sl 1 pwise wyif.

Cast off.

Tassels:
Tassels are optional in this pattern but I have included them on the scarf for Mr M, so this is how I've made them.

I started off with the two ends of the remaining yarn. In my tassels I've used both colours, but you can use only one colour if you wish, but you will have to wrap the yarn twice as much to get the same amount of tassels. I wrapped the yarn twice around my hand, cut it off the ball at the bottom, then along the same place as the ends, cut one side of the loops.

When wrapping the yarn you can wrap it around anything that has two straight edges if you don't wish to use your hand. By using something else you will be able to vary the size of tassel you make and if you are making multiple tassels then you will be able to ensure they are all the same size.

Now you should have four longish lengths of yarn, which are folded in half. With the top end of the tassel (the fold) pull it through a stitch (but not all the way) on the very edge of the scarf at the end. Once you have pulled the tassel part way through the stitch you will have a small loop on one side of the scarf and the tails on the other. Pull the tails through the loop and pull the tails so they tighten the loop around that bottom stitch. Now the tassel is attached.

On my scarf I have made 13 tassels and tried to equally space them along the bottom of the scarf, although if you made 25 tassels you would be able to place them at every other stitch along the bottom of the scarf. But the number of tassels and where you attach them is entirely down to your preference.


Wednesday, 15 February 2017

Crochet Magic Rings

Magic rings are something in crochet that I have struggled with for quite a while, and I've now finally got it all figured out and I feel like I need to share this.

Being left handed, I also crochet left handed (but knit right handed - go figure) which can get confusing when looking at pictures of what to do and having to flip them around!

First Step Left Handed
First Step Right Handed
So the first step is to loop the yarn around your hand (the one that you don't hold the hook in) like this:

This image is left handed, but I have flipped the image so it is right handed and also put it up, so that if anyone does get a little confused you can work it all out!

Step Two.
Then the hook should be fed under the yarn tail above the cross in the yarn. It helps to put your thumb over the cross so it all stays in place. Then grab the other loop of yarn and pull it under the tail piece.
Loop yarn pulled under the tail piece.
dc's along the ring and tail.
With this loop, chain one and that becomes the first stitch in the magic ring. I tend to put in a stitch marker on this stitch so I know where the begining of my round is when starting off a project with a magic ring. So to finish the magic ring off, double crochet (or what the pattern says) along the magic ring, around the loop and the tail.

After the double crochet's have been done and right number of stitches in your magic ring has been reached, the tail that is left sticking out can be pulled tight to create the ring.

The great thing about magic rings is that when they are pulled tight there is no hole in the middle of the ring, which you do have if you try and make a circle by chaining six or so and slip stitching them together.

Because of non-holey-ness this is often used in patterns and until recently I have been guilty of skipping the pattern if it has got a magic ring in it! But now I feel like I have mastered the magic ring, and now have the chance to take on any pattern I feel like.

Finished magic ring with hook through first stitch


Monday, 13 February 2017

Dumpling Kitty

This was a little project I started a little while ago just to try something new, I've made hats and gloves before but never a cat!


I had decided that I was going to make a small animal, so I went trawling through Ravelry. Which is a brilliant site for patterns and ideas!

I found in the end this adorable pattern for these Dumpling Kittys, as they are known, by Sarah Sloyer. The pictures of the ones she has made are just adorable and I wanted to make one, because who doesn't!


So the little kitty cat has his body made in two parts and crocheted together, and then little feet and tail are put on afterwards.

It's well known that when you do something for the first time it doesn't always come out the way you want it, or the way you expect it to, and probably due to my relatively loose tension when crocheting and knitting, my little cat is rather large, and not particularly dumpling shaped! I also managed to not read the instructions on sewing the feet on properly (my bad!) and his little paws are rather far apart at the front.

But apart from his little making mistakes he is cute, and I just love him!

Saturday, 11 February 2017

The Finished Thing:

The Eurofighter is finished! YAY!

For the first try at painting and finishing properly, I don't think it looks too bad.

The matt varnish gives the effect I was looking for - military aircraft aren't usually shiny! - and if you don't look too closely the paint is okay (only a little wobbly in a few places).

Having never put transfers on a model before I can agree with Mr M that they really do add a large amount of detail for not much effort. They give the model a sense of completeness and makes the whole thing look a bit more real, even in miniature!

Even with my dusting mistakes with the varnish, it has given the wanted effect and only in the small cracks where the varnish had pooled was there any discolouration from too much varnish.

All in all this is a nice turn out to this model, and I'm a little proud of it!

Read more about it's progress here:
Putting the transfers on
Varnishing


Starboard Side

Nose Detail

Body Detail